


If you're a fan of Dark Domes' mystery games like me, then this Hidden Memories guide is definitely something you need to read!
Your objective is to solve the puzzles and help Lucian along the way. If you have played games like Another Shadow and Escape From The Shadows, this will be easy!
Haven't downloaded it yet? Get it now on the Play Store! Let's begin!

Hidden Memories Gameplay
To enter a room, tap on the arrow on the side of your screen, or tap on an open entryway. Collect as many items as you can during gameplay, so tap on everything you can!
Hidden Memories – Area 1: Unknown Place
You will start off in a room. Collect the phone by tapping on the drawer. Tap on the arrow to the right and collect the pizza. Use the code on the pizza box to unlock the phone, starting on the left:

Go back to room 1 and collect the notebook from the first cabinet drawer. Collect the key from the second drawer. Tap the phone in your inventory and tap on the delivery icon. Tap on the pizza symbol and use the total price, $52.94 on the notebook.

Use the white key to unlock the grey cabinet. Use the notebook clue to flip the toggle switches. Give the fish the pizza and scoop out the key with the net.
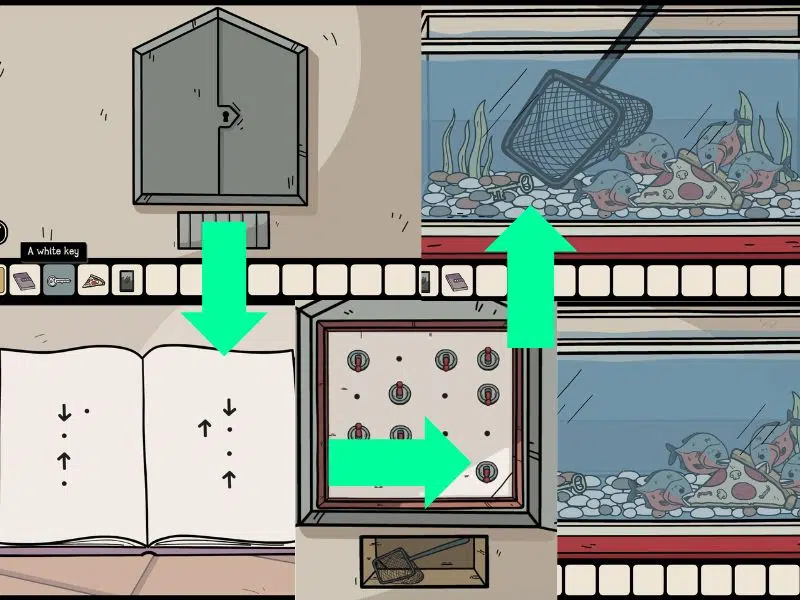
Use the key to open the cabinet and remove the photo from the jacket. Tap on the pocket in your inventory and tap on the Bar Location.

Hidden Memories – Area 2: Bar
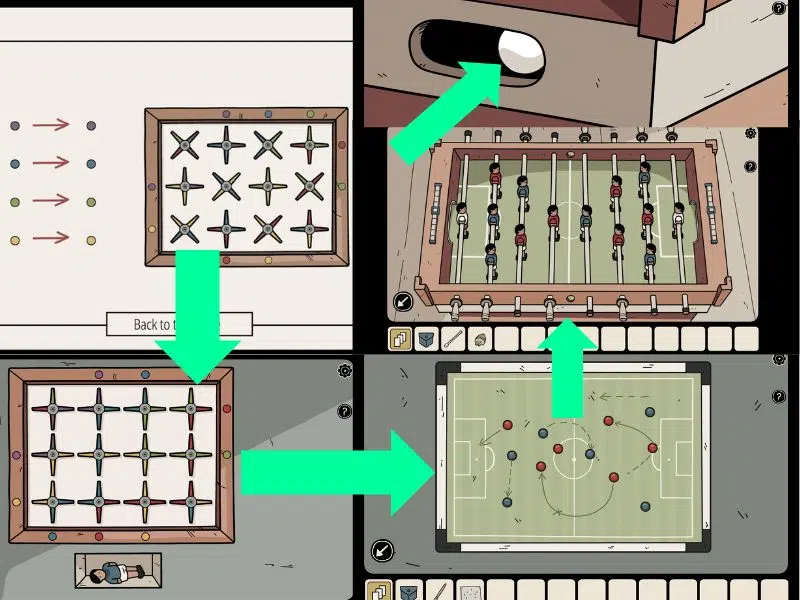
Tap right and enter the curtain room. Tap on the board on the right hand side and connect the colours as can be seen below in the image. Collect the football player. Tap on the arrow to enter the far-left room. Use the picture above the football table to match the players and add the remaining player. Collect the ball:
Tap right and then enter the curtain entryway to enter the room with the clown. Use the clues on the coloured flags in the room with the bar. The patterns they create will be used on the suitcase as can be seen below:
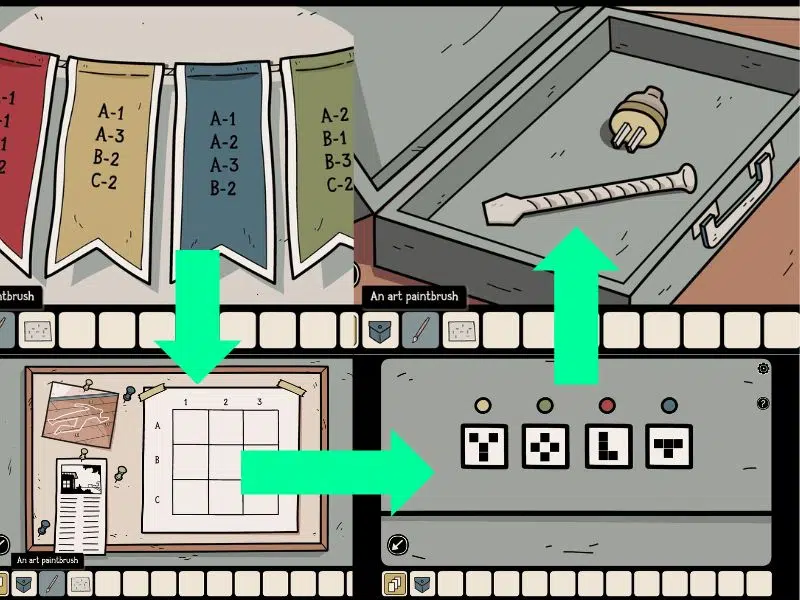
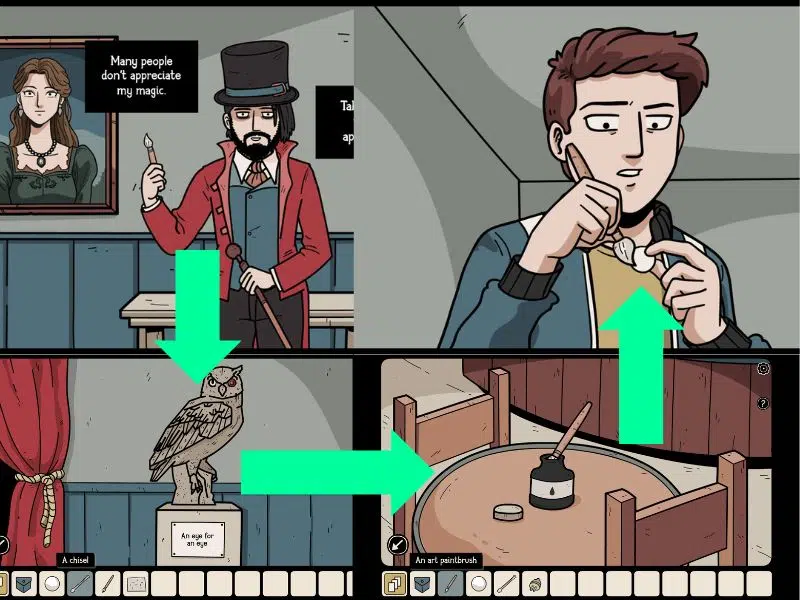
Collect the parts. Tap on the magician in the room to the right to receive his paintbrush. In the curtain room, place the paintbrush in the bottle of ink and tap the ball in your inventory. Tap on the owl statue and use the chisel to remove the gem. Place the ball in the owl's eye socket.
In the football room, place the gem in the painting. Use the symbols on the brown box and collect the lightbulb. In the clown room, place the lightbulb in the lamp and place the plug in the socket. Tap on the plug to attach it to the wall:
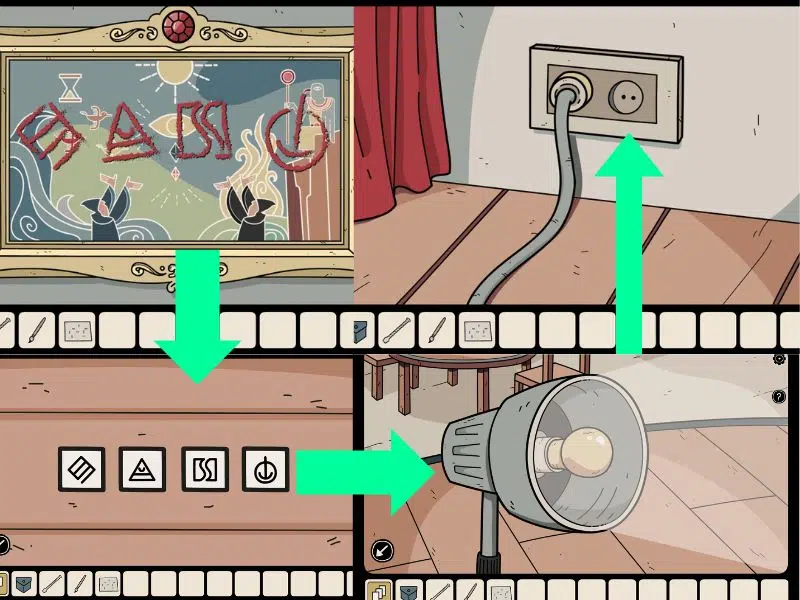
Use the symbols the clown shows you on the red cabinet, with the book clue too:
Collect the lemon and take it to Lucian. Take the knife. Use the knife on the woman painting and talk to the magician again. Take his magic handkerchief when his back is turned:
In the clown room, take the x-ray from under the stage and put it on the board by the magician. Make sure the plug is in the socket. Switch on the x-ray switch machine and use the handkerchief to remove the key. Use the red key on the brown chest and collect all items.
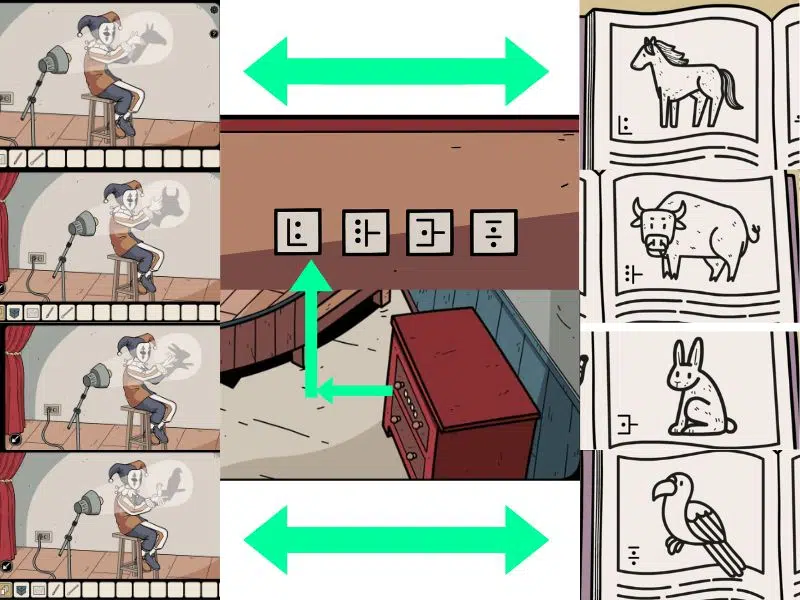
In the football room, tap on the man and play the game. Use the paper clue to play:
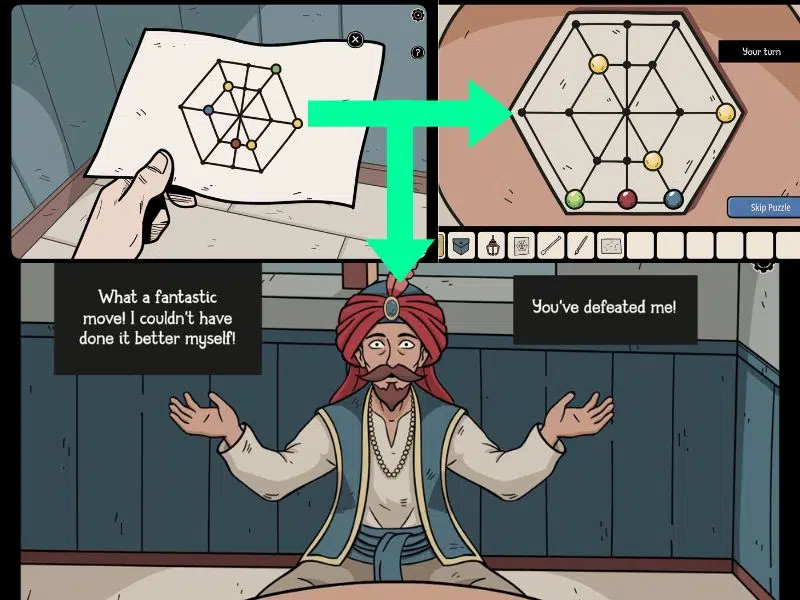
Use the key on the teddy machine for the mechanical box and use the paper clue you collected from the menu by the bar.
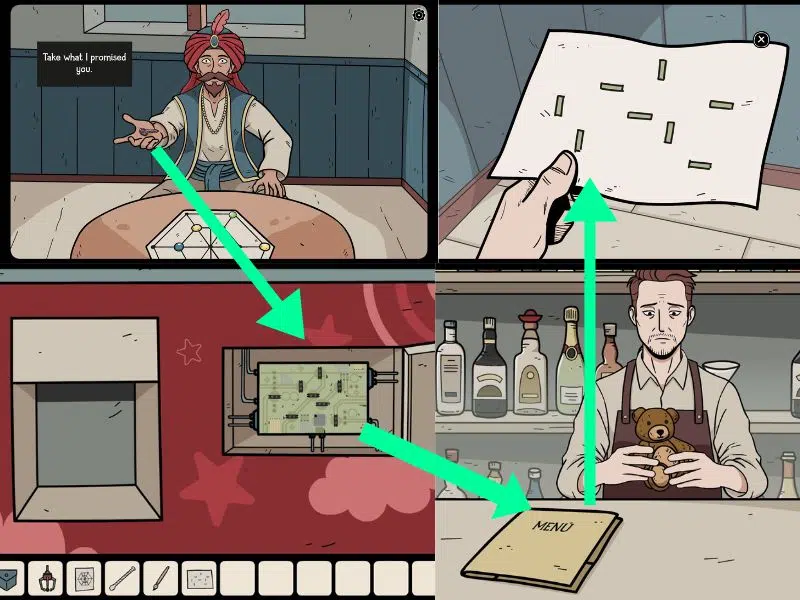
Place the claw on the teddy machines' mechanical arm. Use the right arrow to move to the teddy and use the handle to catch the teddy. Collect the teddy. Give the barman the teddy and then drink the liquid.

Hidden Memories – Area 1: Unknown Place
Use the clue you found on the glass at unknown place on the blue box. Take items. Place the gear in the clock.

Use the clue behind the red curtain to move the clock's hands.
- Red = Sun
- Yellow = Moon
- Blue = Star

Collect the bird. Place the bird in the framed picture with the tree and take the note:

Use the clue on the board, arrange the symbols accordingly and collect the ring. Use the ring on the hidden trapdoor on the floor and collect the photo:

Click on the photo and go to the Garden Location.

Hidden Memories – Area 3: Garden
Go to the left and tap on the mushrooms. Collect the clue. Use the clue to move the frogs to the correct stones and collect the items:

Collect the yellow key from the bench. Use the key on the green box. Place the red valve on the pipe and turn the valve. Collect the cheese and use the symbols on the red box. Collect the key and the bird food:

Put the bird seed in the nest and tap on the bird to see the clue on its foot. Use the clue on the white cabinet. Take the items:

Place the cheese by the wooden stump. Go right and use the key to unlock the golden gate. Use the ocarina to play music to the man. Use the mice pattern for the sheet music. Each grey mouse should be marked black on the sheet. Tap on the man to play the music and collect the key:

Use the white key in the shed's door. Collect all the items in the shed. Take the chalk out of the book. Collect the clue in the empty wood stump. Go to the drawing board and draw a picture of mountains, moon, bridge, and the lighthouse.

Use the key on the storage box and collect the items. Go to the shed and take the tin can out of the cupboard. Fill the can with water at the fountain.

Plant the seed in the flowerpot and water it with the tin can. Use the clue on the brown chest. Collect the items.

Use the bag of cement you collected from the white cabinet. Check the clue. Place the cement, sand, and water in the mixer (use the tin can again) and use the switch to mix the cement. Place the wheel on the wheelbarrow. Tap on the wheelbarrow. Use the trowel from the inventory to add cement to the hole.

Place the pole with the scarecrow in the hole. Tap the yellow flower. Go to the barn and tap the vase to place the flowers in the same order as the picture.

Hidden Memories – Area 1: Hidden Place
Use the clue in unknown place on the cabinet. Solve the puzzle and collect the items:

Collect the record from the red table. Use the key to open door on the left. Place the record on the record player. Open the cabinet with the red surface and collect the arm. Place the arm on the record player and tap again. Use the notes clue on the cream box. Collect the wind up key.

Go left. Tap on the red cabinet and collect the robot. Place the wind up key on the robot and place him under the bookshelf. Collect the red key:

Use the red key by the desk. Collect the photograph in the tube. Go to Laboratory Location:

Hidden Memories – Area 4: Laboratory
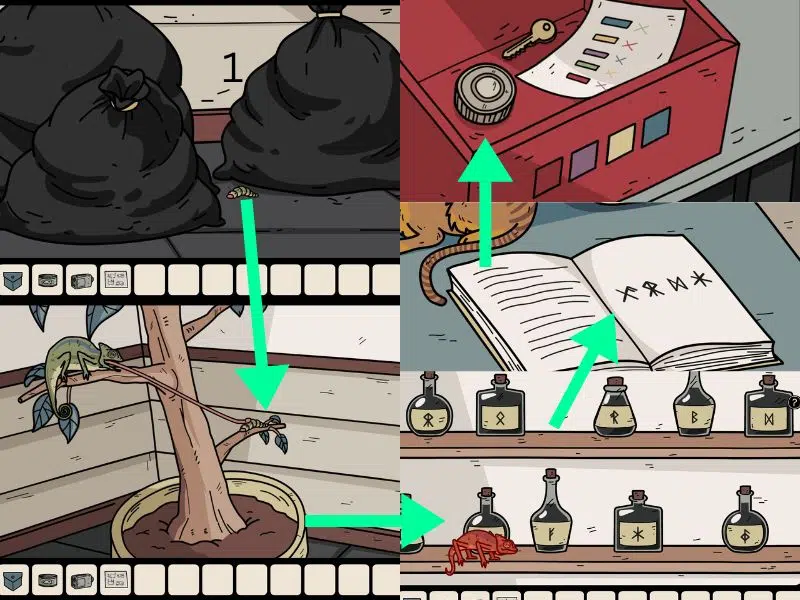
Go to the last room on the left. Take the note with the cats. Count each cats' clues and note the colour of each cat. Use the clue on the brown cabinet and take the items:

Collect the caterpillar by the trash bags. Place the caterpillar in the plant. Collect the chameleon. Check the images in the book. Place the chameleon by the bottles with symbols. Use the colours for the red box and collect the items:
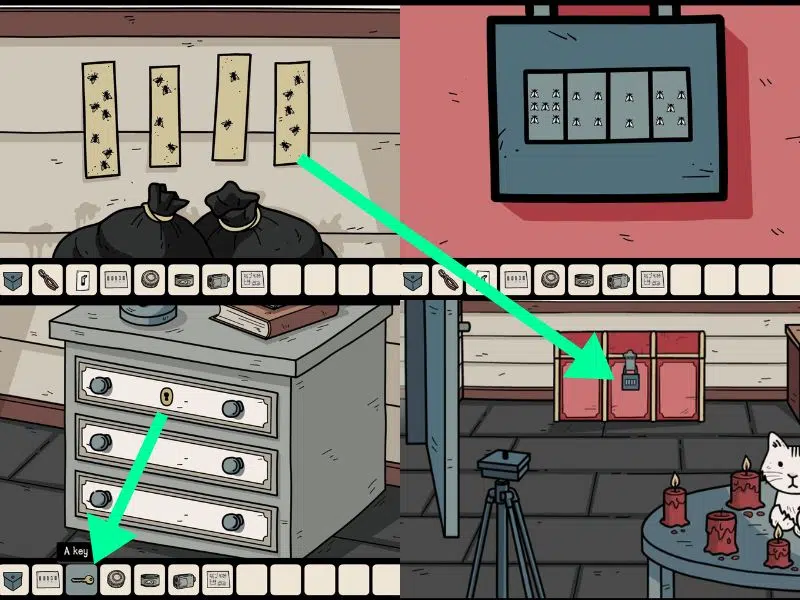
Use the key by the grey cabinet. Collect all the items. Place the strips by the trash bags. Use the clue on the red chest and collect the items:
Place the video recorder on the stand and place the lens on the recorder. Open the recorder by tapping on it again and see the next clue. Place the light switch in the space and turn off the light.
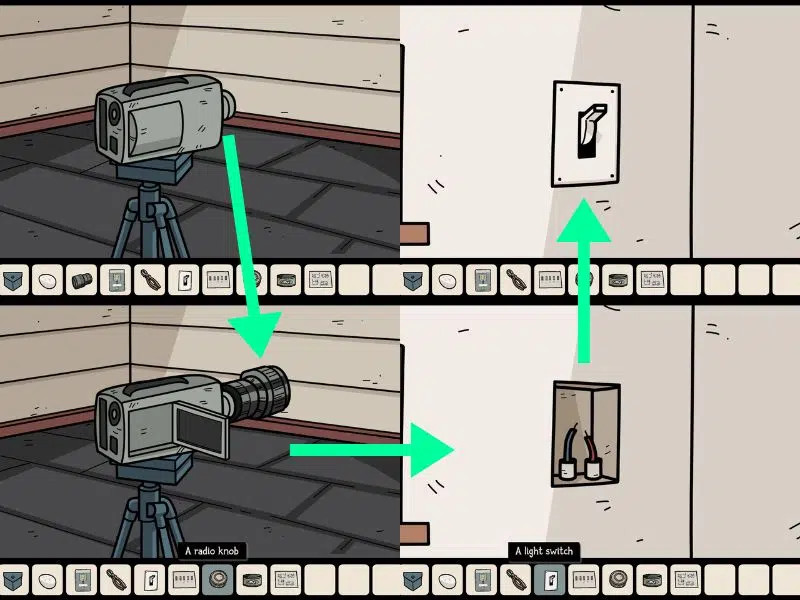
Look through the video camera again. Touch the shadows for the next clue. Collect all the items.
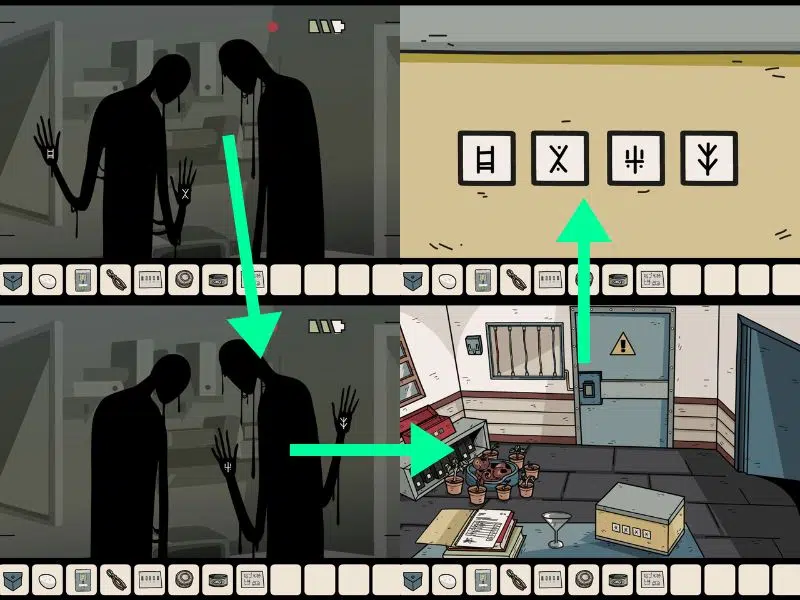
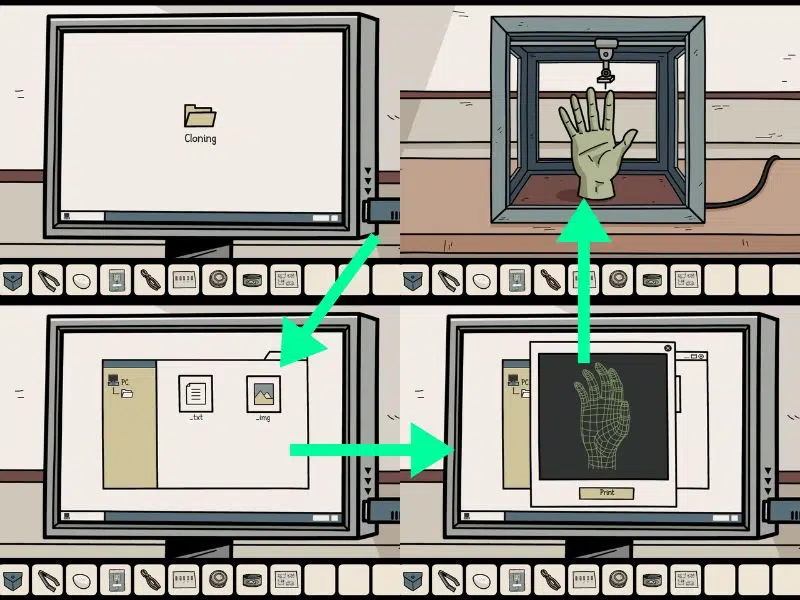
Place the USB drive in the computer. Use the access card in your inventory to see the code and enter it into the computer. “532009”. Tap the image file and select print. Tap the hand:
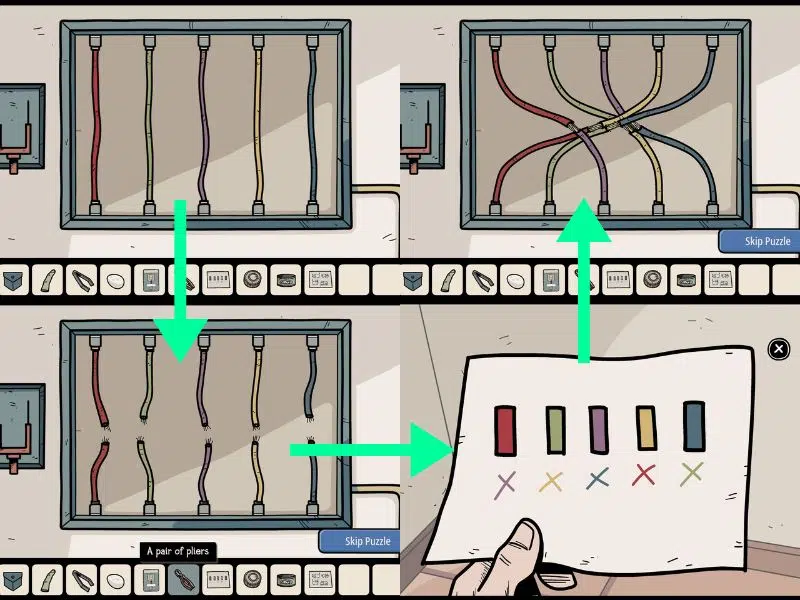
Go to the circuit board. Collect the glass on the table. Use the pliers to cut the wires and rematch them according to the paper clue. Flip the switch:
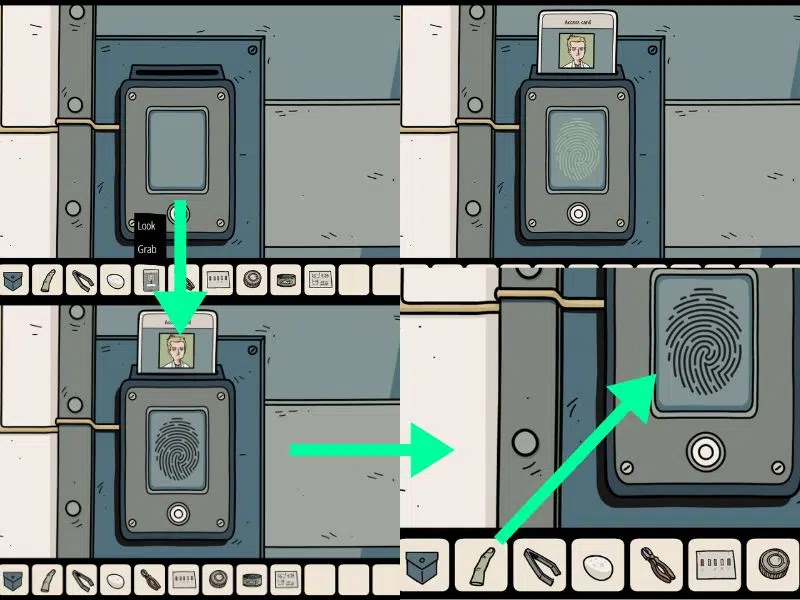
Tap the access card, select grab and place it in the slot. Tap on the finger and use it on the scanner:
Collect all the items in the room. Use the can opener on the sardines. Feed the crab in the fishtank. Use the tweezers to grab the crab.
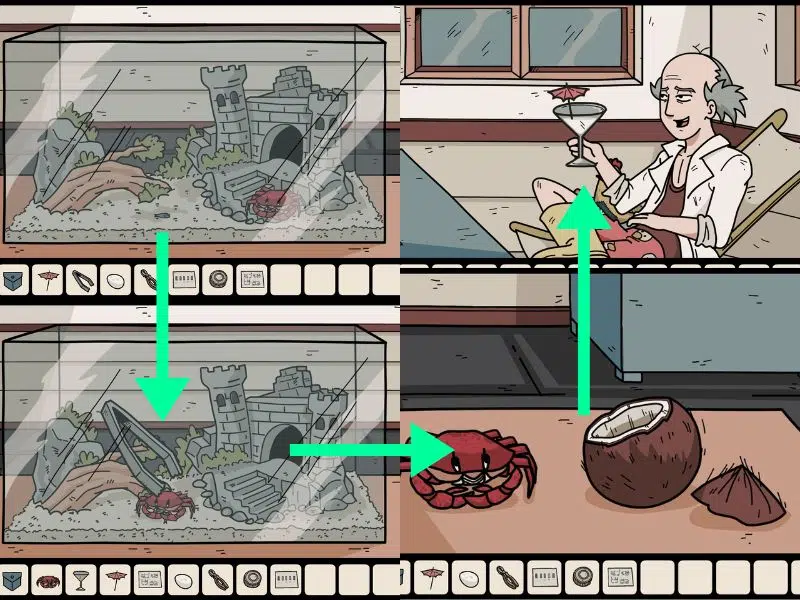
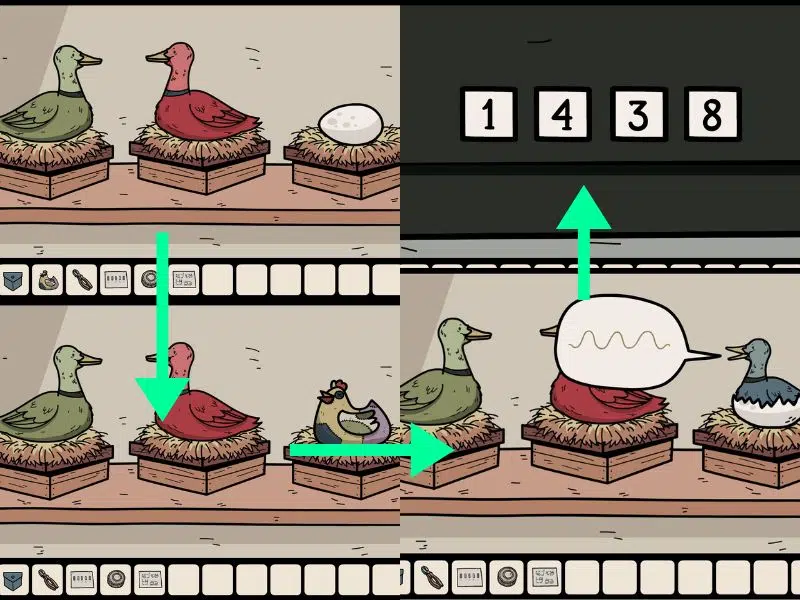
Use the crab to open the coconut. Take the coconut. Put the umbrella and coconut juice in the glass. Give the drink to the old man. Take the chicken. Place the egg and the chicken in the nest. Place the radio knob on the radio. Use the radio frequency from the ducks to see the next clue. The code is 663 +892 – 117 = 1438.
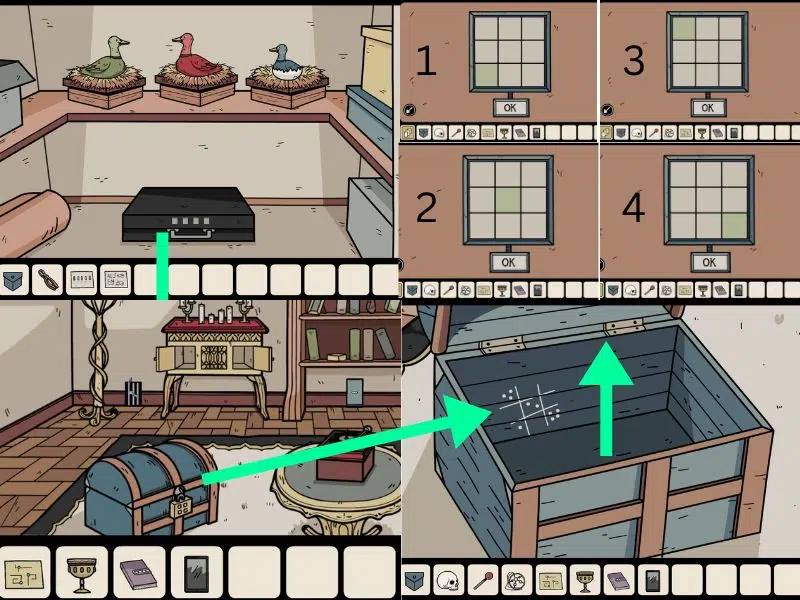
Use the code on the briefcase for the next clue.
Hidden Memories – Area 1: Unknown Place
Use the code in the blue chest in unknown place. Use the clue from the chest on the brown cabinet with the red top. Tap 1, 2, 3, 4. Collect the battery.
Use the lever by the extractor fan. Take the paper plane. Place the battery on the safe lock device. Enter the symbols as follows:
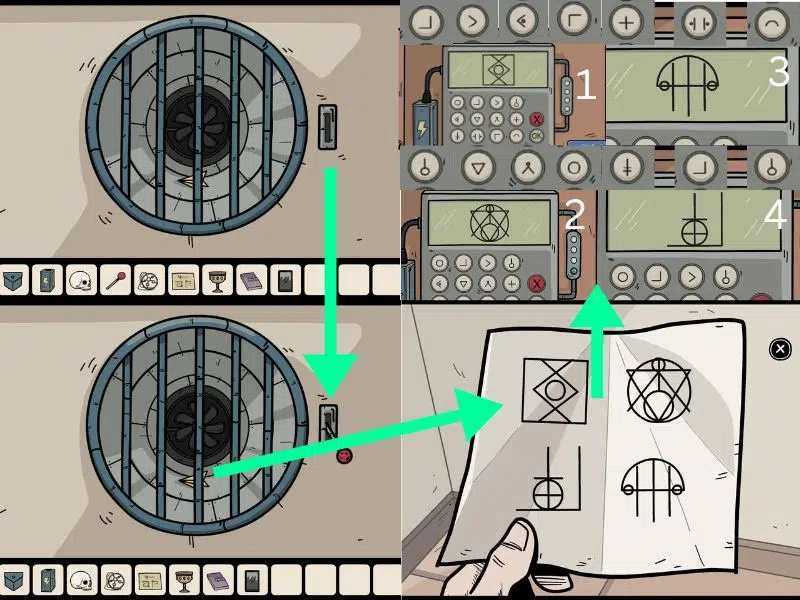
Use the code on the metal cabinet. Collect the photo. Go to the Mansion Location.

Hidden Memories – Area 5: Mansion
Use the items in the jars as the next clue. Use the clue on the white wall cabinet. Turn the dial to sync with the number of items in the jars. 5, 4, 7, 3. Collect all the items.

Collect the key from the white chest of drawers. Use the key on the door. Use the note in your inventory to place the fingers in the correct number sequence. Collect the items:

Use the blue key on the duck frame. Check on the mirror for the complete clue and use the symbols on the white chest of drawers and collect all items:

Attach the tape to the firework and place it on the wall next to the lamp. Use the matches to ignite the firework. Use the code “4692209” on the old fashioned telephone. Tap on the earpiece first and then enter the numbers.
Pro Tip: If you make a mistake, touch the earpiece again to start over.

Use the clue from the phone for the steps. Collect the item. Collect the screwdriver handle from behind the red curtain. Use the glue to fix the screwdriver, then use the screwdriver on the metal grid and collect all items:

Attach the arm to the statue and use the hand clues to adjust the arms. Collect all items:

Use the tree with eyes and touch them in the sequence below. Use the numbers 3, 5, 2, 4 on the green box. Collect the items, as well as the perfume bottle from the table.

Use the razor blade to open the dog teddy (I know, sad, right?). Collect the crayons. Give the crayons to the little girl. Place the three quartz in the stone statue. The colours match the sequence for the blue chest.

The stones by the little girl match the colors from the quartz statue and symbols on blue chest. Use red, green, blue, and yellow symbols on the stones and collect the items. Place the dragon on the chessboard. Your objective is to capture the two clay pieces using the dragon as a stopper, and the two blue and pink pieces will remove the clay pieces. Collect the hand. Use the garden glove to pick the rose. See the image:

Collect the pot from the cabinet. Place the firewood inside the stove. Light the firewood with matches. Place the pot on the stove. Place the oil and the rose in the pot. Place the perfume bottle in the pot to collect the liquid.

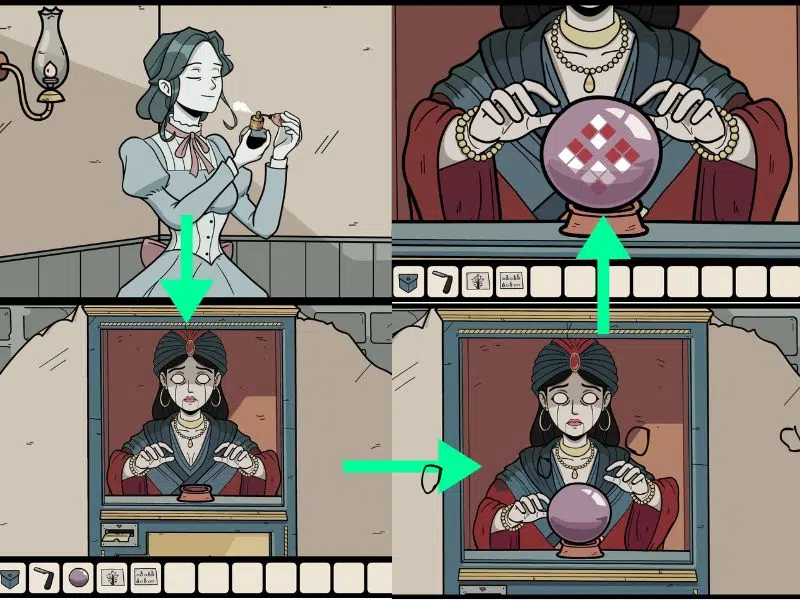
Give the ghost girl the perfume. Use the ticket by the fortune teller. Place the crystal ball in the hole. She will give you the next clue:
Hidden Memories – Area 1: Unknown Place
Use the symbols on the grey safe in unknown place. Collect the item. Take the plaster from the medic box. Put the plaster on the bats wing. Take the crown.

Use the notebook for the symbols required. Place the skull, medallion, crown, and the goblet in the holes on each side of the door. Enter the room.

Hidden Memories – Premium
To continue playing to see the ending, you will need to purchase the premium version.
Final Words
That is all for now guys! I hope you enjoyed solving the puzzles in Hidden Memories as much as I did! Feel free to comment in the section below if you do get stuck, and if you would like the rest of the clues for the premium version.
For more dark Dome games like Hidden Memories, feel free to check these out before you leave: Beyond The Room, and The Past Within.


Thank you for posting this. It made my life easier andthe story more fun.
Can you do a post about finding the location of 9 black cats?