

Dark Dome, the developers of Another Shadow and Escape From The Shadows, bring us the latest in the series of Dark Dome puzzle games; Beyond The Room. The eighth installment is sure to keep players on their toes if you enjoyed the other games released previously.
Although these games can be played in any order, Beyond The Room and Nowhere House share a connection. Keep that in mind when playing this puzzle game.
In this article, we will guide you through each puzzle with step-by-step instructions, as well as images to help you pass the stages. Let's begin!
Beyond The Room – Basics
Interaction
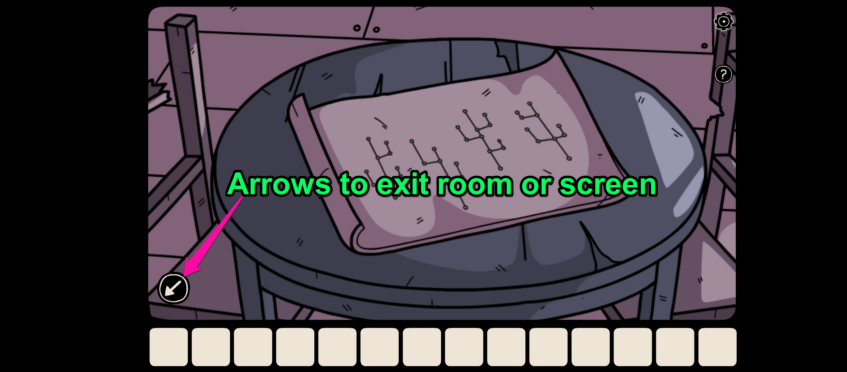
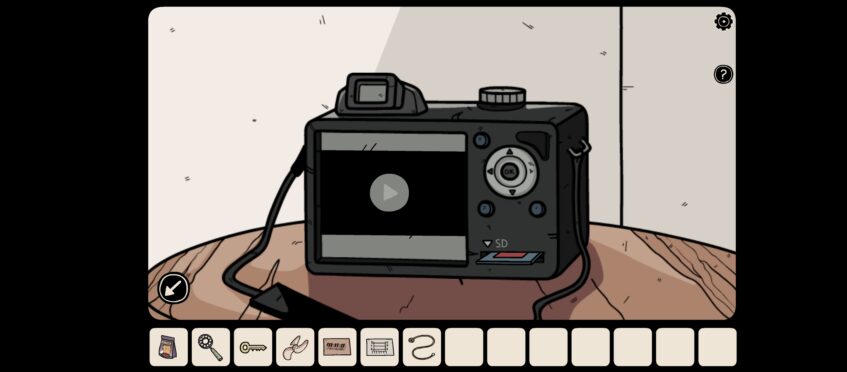
In Beyond The Room, you will need to tap on items to interact and solve the puzzles. To exit a certain area or move to another room, tap on the arrows located on your screen, as can be seen in the image below:
If no arrows appear, tap on the screen closest to the available area you want to move to.
Beyond The Room Gameplay
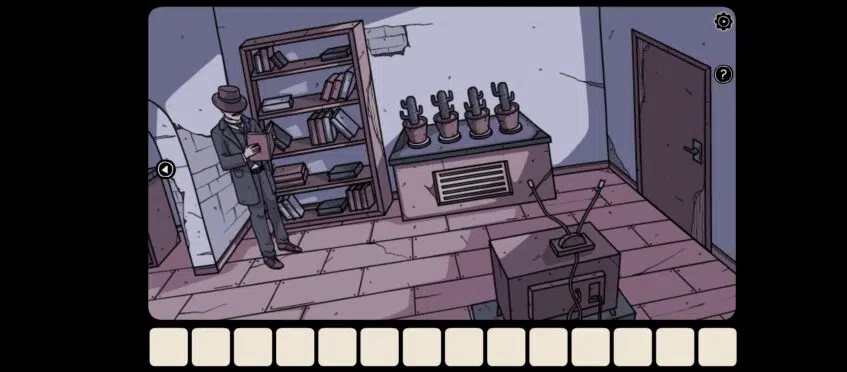
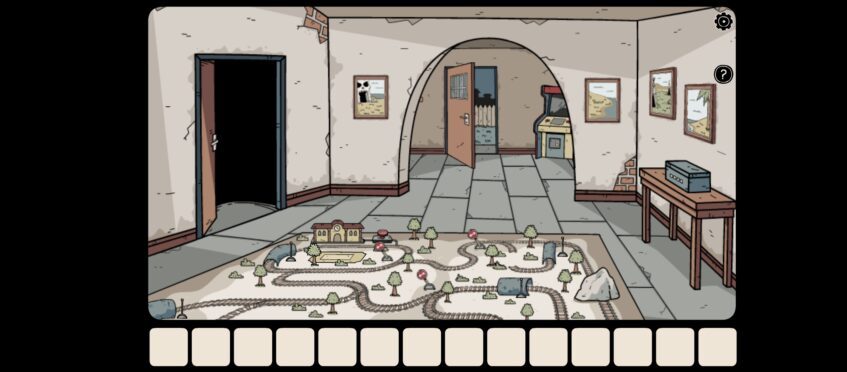
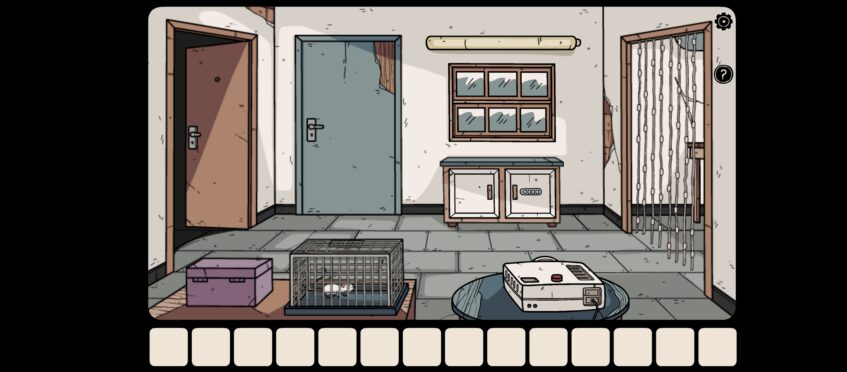
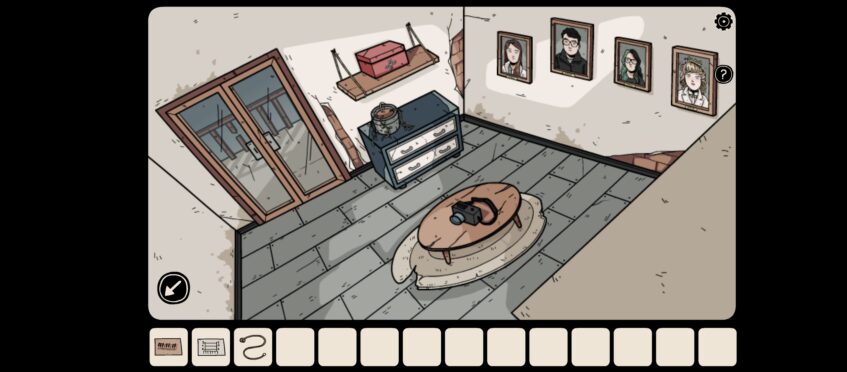
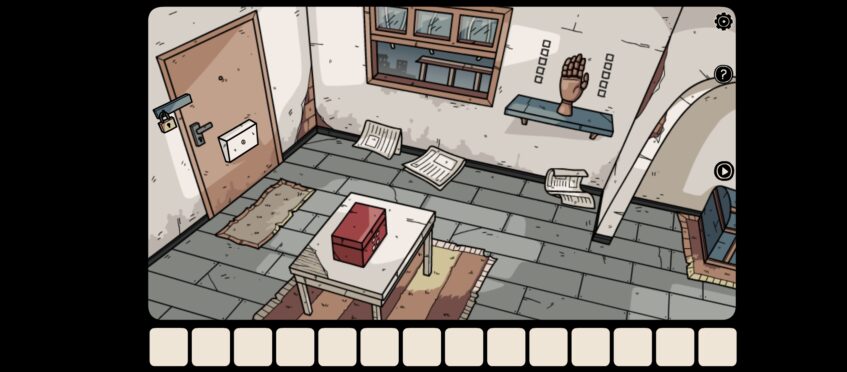
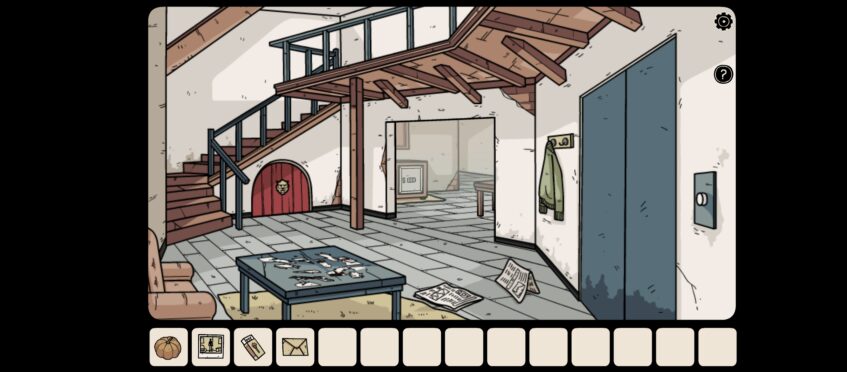
After a cutscene showing you the storyline, you will be taken into a room that looks like this:
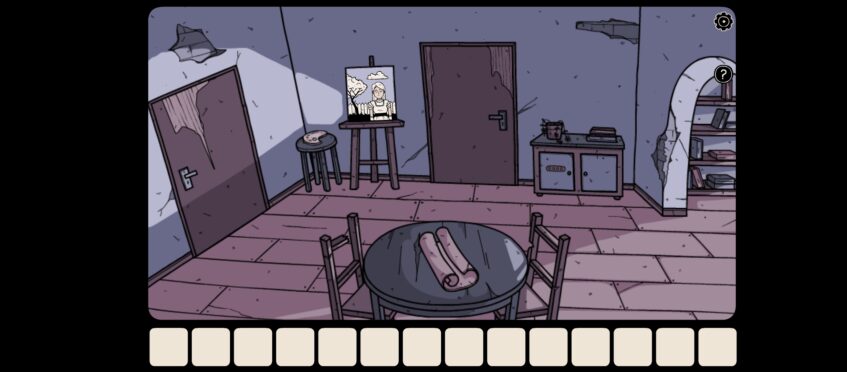
This is your own apartment, and we will be exploring it before moving on.
First Room Clues
The following clues can be found in this room:
- A table with a roll of paper revealing symbols.
- A cabinet in the right-hand side corner at the top of your screen.
- A woman in a painting with a palette alongside her, on a circular table.
- 2 doors, one in the center and one on the left. A third archway opens into another room.
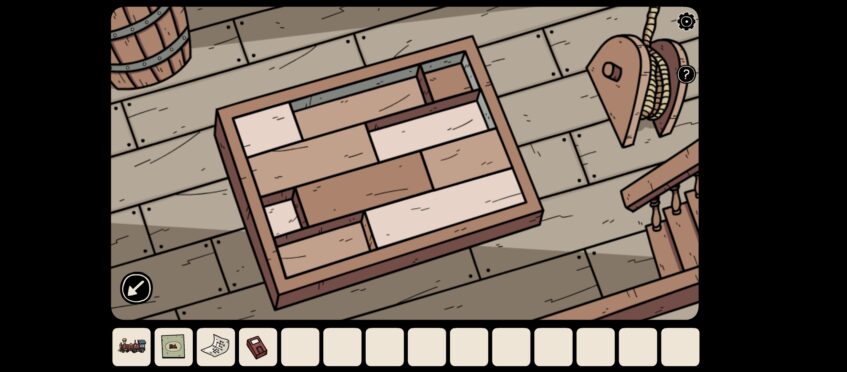
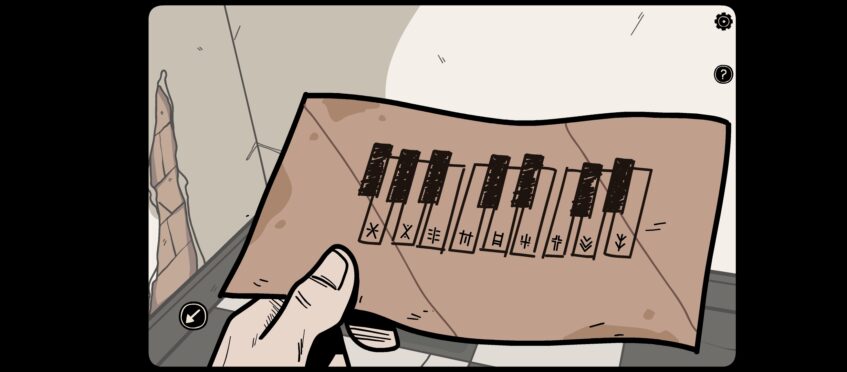
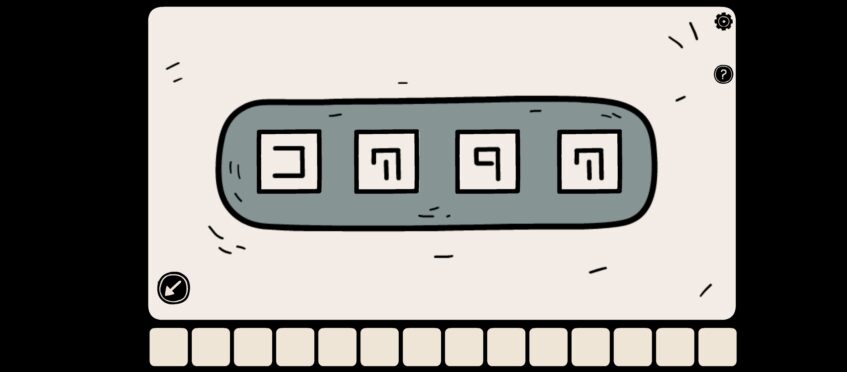
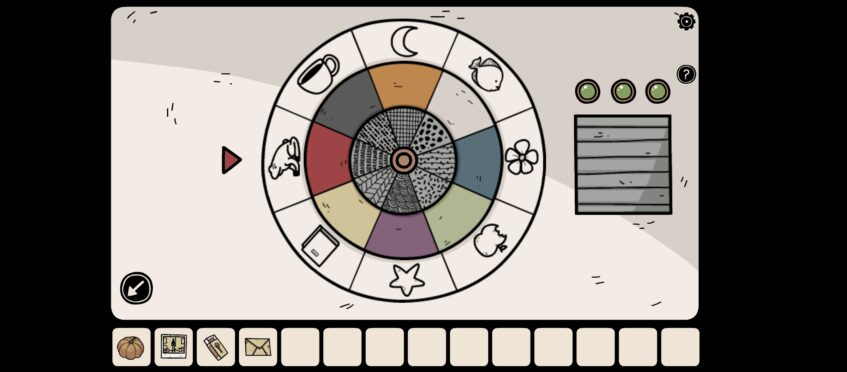
Tap on the table located in the center of your screen, and tap on the roll of paper. It will open to reveal symbols:

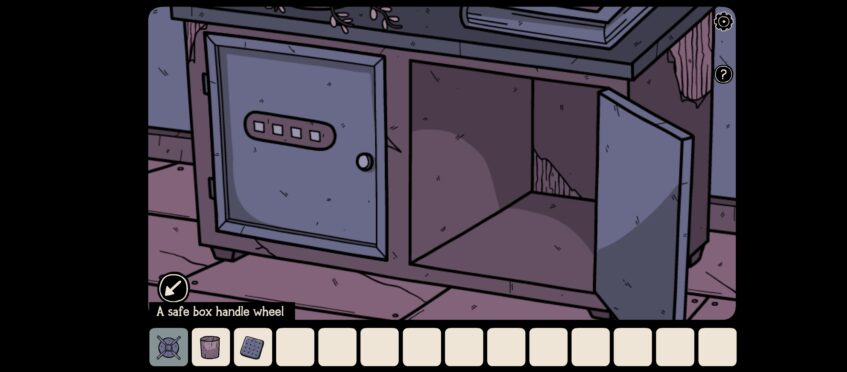
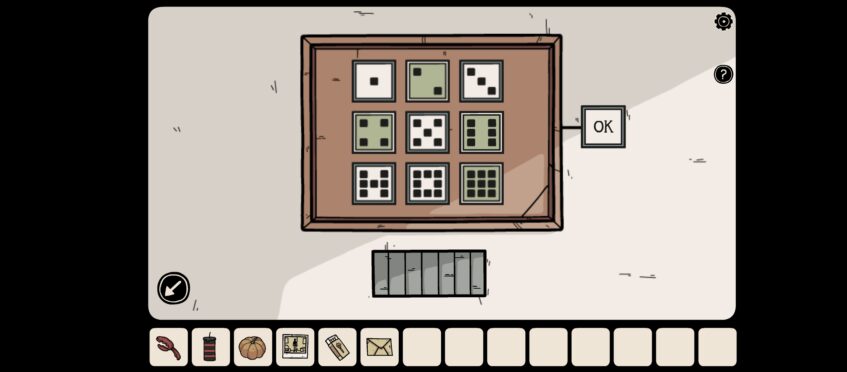
Tap on the cabinet in the right-hand side corner and open the right door by tapping on it. Tap on the safe box handle wheel to place it in your inventory. We will use this later.
Press the back button and tap on the right-hand side of your screen, leading into the second room.
Second Room Clues
In the second room, you will find the following clues:
- A man standing upright, holding a book.
- 4 plants on a table (Cactuses).
- A television set.
- An archway leading to the first room, and a second door on the right, leading to another room.
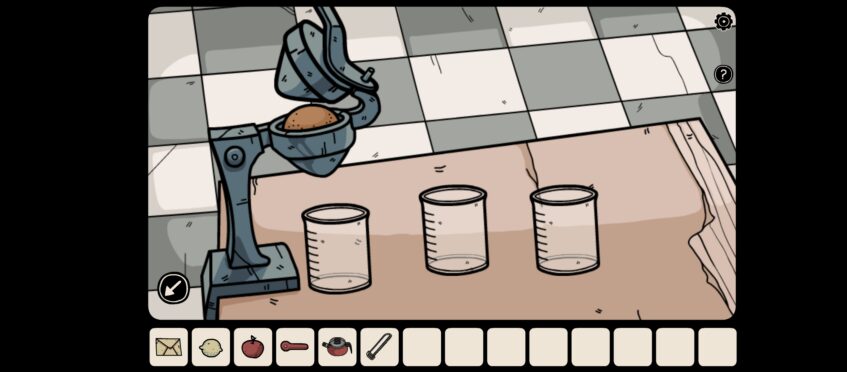
Tap on the table with the plants on them. According to the image you saw on the table, rearrange the cactus plants accordingly:
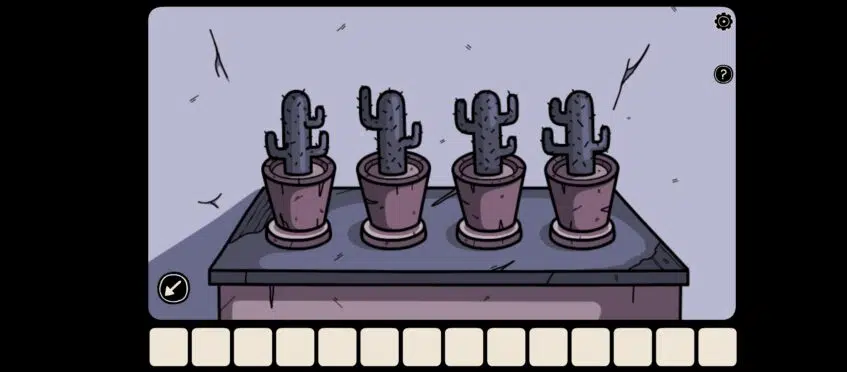
A secret compartment will open revealing a large cork, and a large cracker. Tap on them to add them to your inventory.
Tap on the man standing there. He needs glasses to be able to read his book. We will return to him later.
Tap on the door on the right and tap on the dark space to enter the third room.
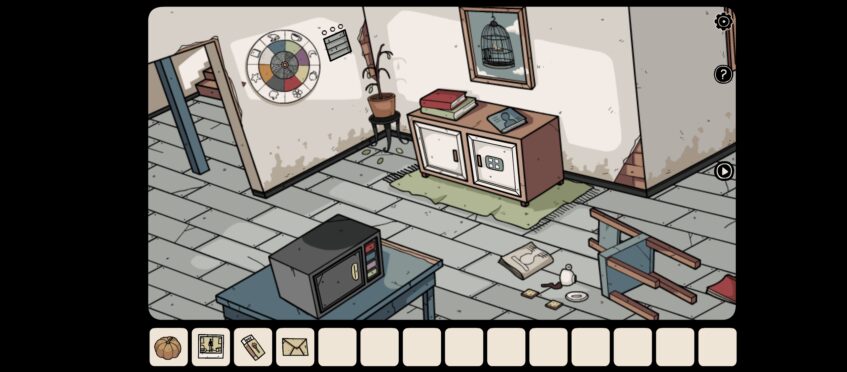
Third Room Clues
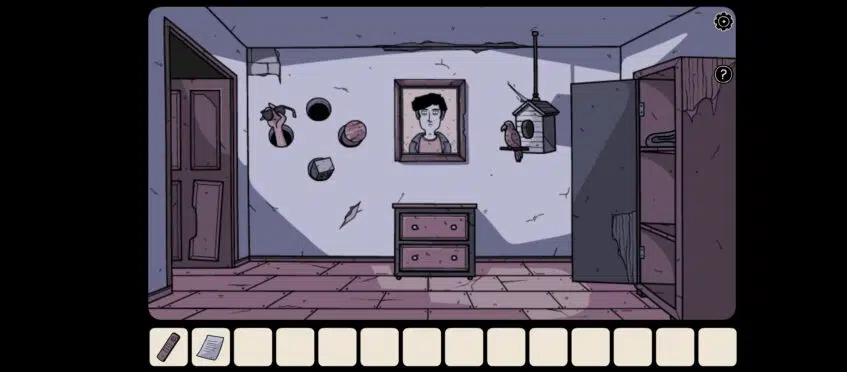
The third room reveals the following clues:
- A cupboard on the right-hand side.
- A parrot sitting on a perch by its nest.
- A portrait of a man in the center of the room against the far wall.
- 3 holes in the wall, with the fourth hole being occupied by a hand holding glasses.
- A chest of drawers in the center below the portrait.
- A door leading to the second room.
Tap on the portrait of the man and tap on him again. Watch the direction of his eyes. They have a sequence:
- Left,
- Right,
- Left,
- Right,
- Left,
- Left, and
- Right
We will use this later.
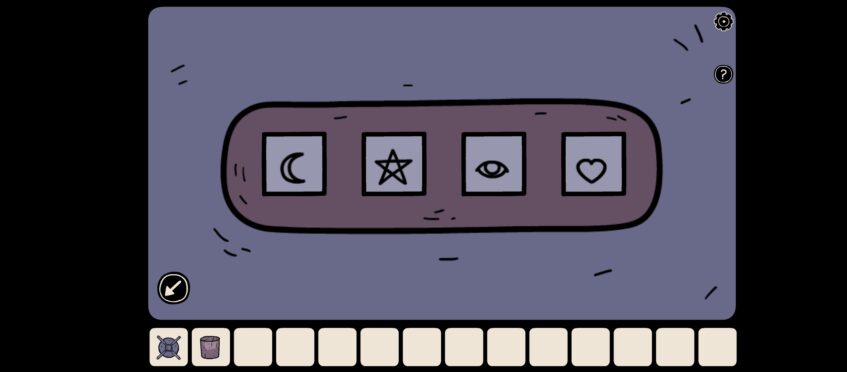
Tap on the bird feeder and tap on the parrot. Feed him the cracker by tapping on it in your inventory and tap on the bird again.
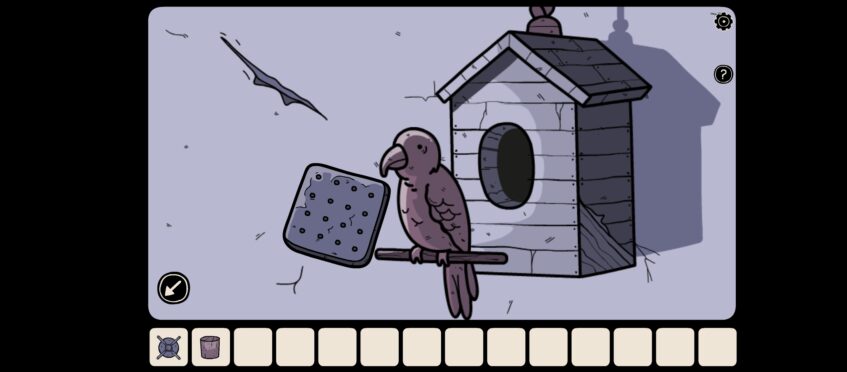
He will reveal a clue:
- The Moon
- A Star
- An eye, and
- A heart
Go back to the first room, where we found the roll of paper on the table. Using the clues above, enter them into the cabinet in the right corner.
Tap on the left-hand side door. Tap on the two items and place them in your inventory. They are:
- A pink key, and
- A brick
Use the pink key to unlock the door to the left in the same room. Enter the fourth room.
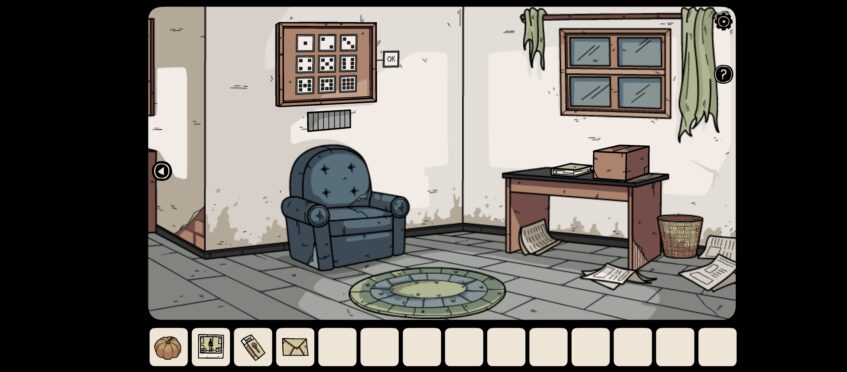
Fourth Room Clues
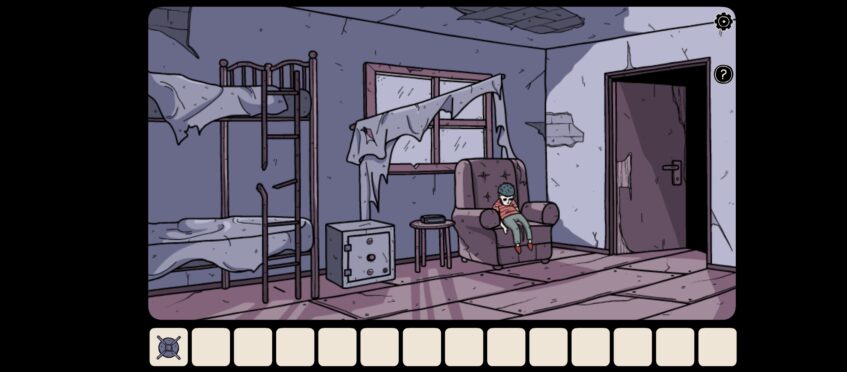
Once you enter the fourth room, you will see the following clues:
- A bunk bed on the left-hand side of your screen.
- A safe alongside the bunk bed.
- A circular table with a digital clock.
- A ragdoll on the chair.
- A door on the right leading back to the first room.
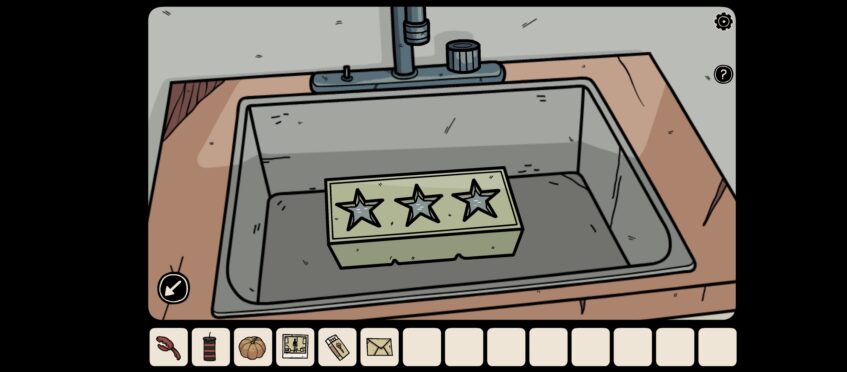
Tap on the bottom bunk bed, and remove the bed sheet by tapping on it. Pick up the paper by tapping on it. This paper reveals a clue as to which colors are needed to paint the portrait of the girl in the first room.
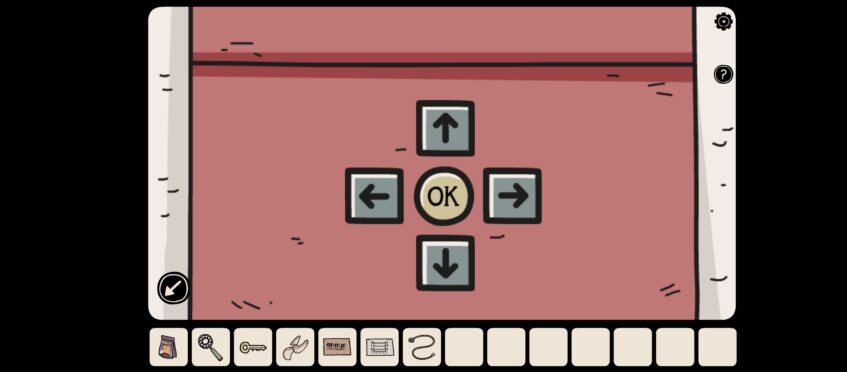
Tap on the safe and place the wheel in the center.
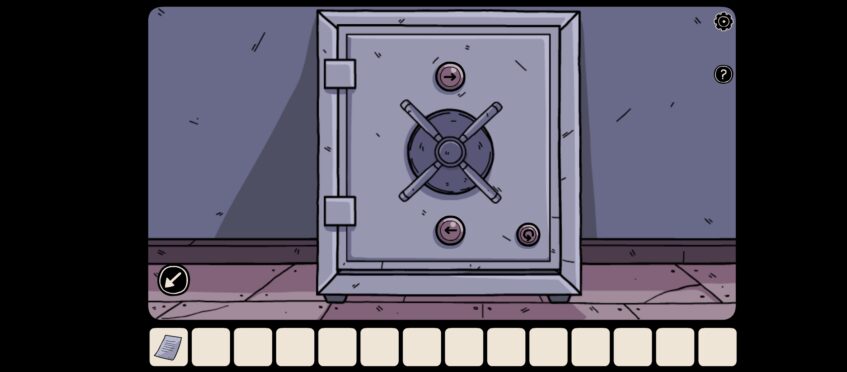
Using the sequence we learned from the man in the portrait in the third room, tap on the arrows of the safe in the same sequence. The safe will open to reveal a television remote. Tap on the remote to place it in your inventory.
Proceed to the second room where you found the plants and tap on the Television set. Tap the TV remote control and tap on the TV. You will find the following clue displayed on the TV:
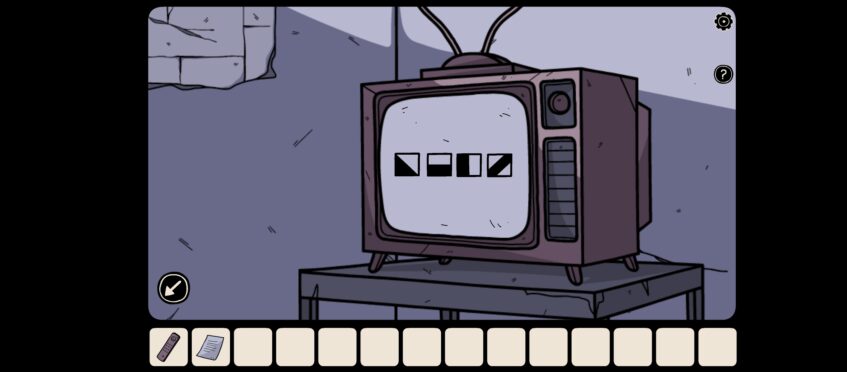
Proceed to the third room and tap on the cupboard. Using the clues above tap on the squares until each one is in sync with the ones above. The cupboard will open and a blanket will be revealed. Tap on the blanket to pick it up and proceed to the third room with the parrot.
Use the blanket, brick, and cork to close the holes in the wall, like this:
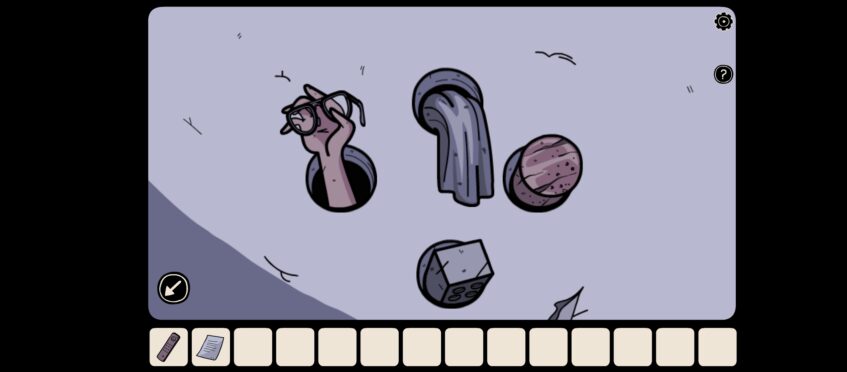
Tap on the hand with the glasses.
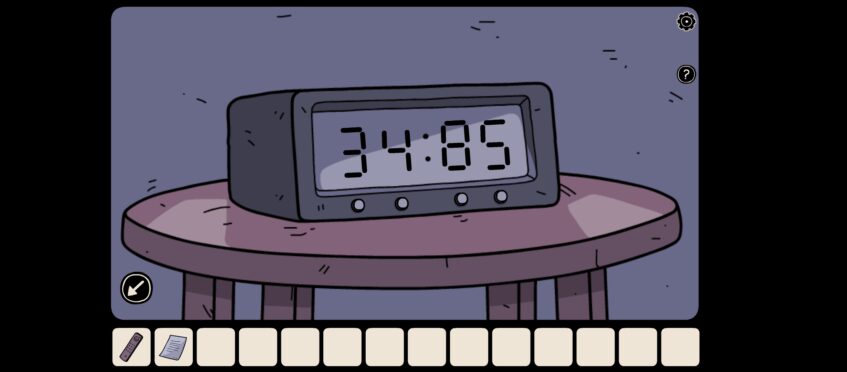
Go to the second room, tap on the glasses in your inventory, and tap on the man with the book. He will give you your next clue, which is “34:85”.
Proceed to the fourth room, where the ragdoll is, and tap on the circular table with the digital clock. Using the circular buttons on the digital clock, tap them until the digital clock reads “34:85”.
Watch the cutscene. On the armchair, you will find a paintbrush. Tap on it to add it to your inventory.
Proceed to the first room with the portrait of the lady. Using the piece of paper in your inventory, you will paint the portrait accordingly:
- Dress = Yellow
- Tree = Purple
- Cloud = Pink
- Wooden Fence = Green
- Hair = Blue
Tap on the palette using the paintbrush in your inventory and paint according to the clues above.
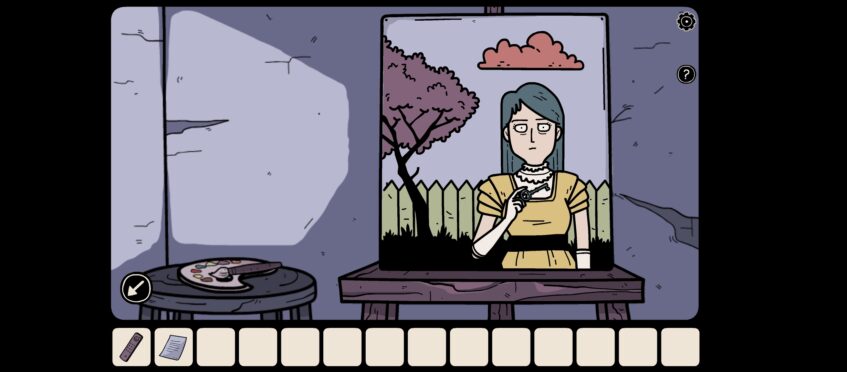
The lady in the portrait will reveal a key. Tap on it and use the key on the door in the center of the same room.
Abandoned House
After you have watched the cutscene, you will travel to the abandoned house you have been dreaming about.
Beyond The Room – First Floor
First Area Clues
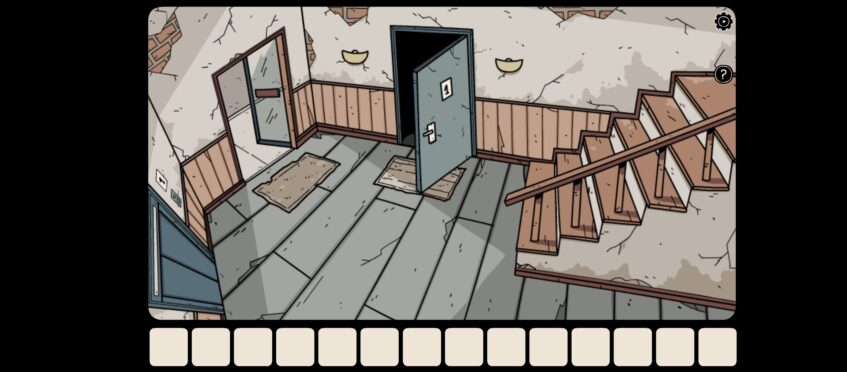
After watching the cutscene you will be taken to a new building in Beyond The Room. The following clues are available in the first room:
- An elevator on the wall closest to you is in the left-hand side corner.
- A door leading outside – which you cannot enter yet.
- A door with the number 1 on it.
- A staircase leading upstairs.
Proceed upstairs on your right to the landing. There you will find another elevator and a door with the number 2. Go downstairs again and go through door number 1.
Room 1 Clues
In the first room you will find the following clues:
- A train set with movable railway lines.
- Four portraits, each containing a different amount of bones and various images.
- An archway leading to another room.
Proceed through the archway.
Room 2 Clues
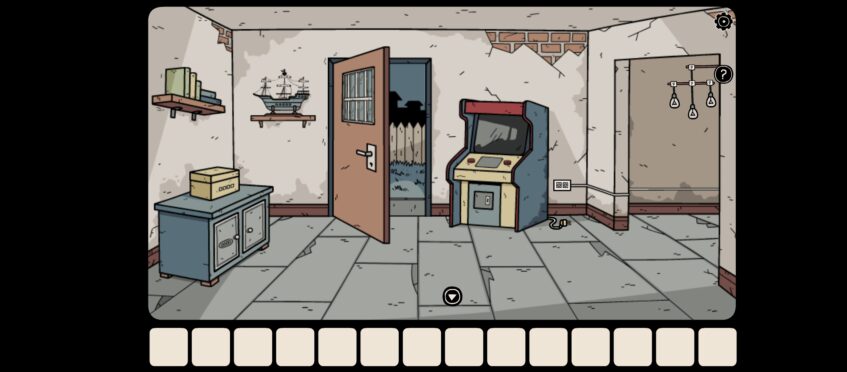
In room 2 you will find the following:
- A cabinet with 2 doors. Open the first door on the right and tap on the fingerprint scanner to pick it up.
- A ship mounted on the wall.
- A game machine.
- A third door leading to outside.
- A fourth door leading to another room.
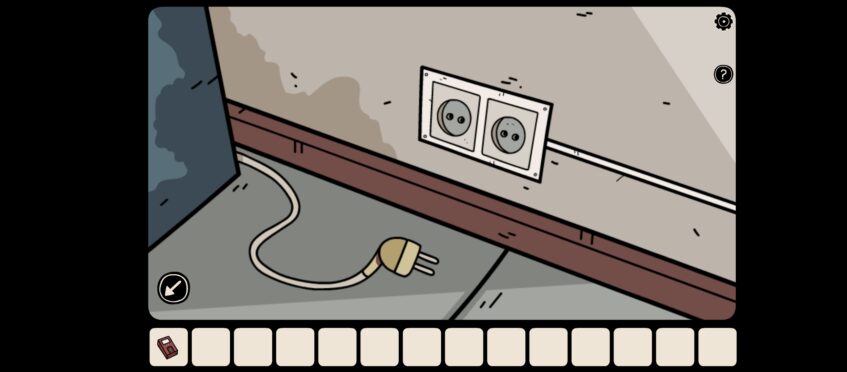
Tap on the cord lying next to the jukebox, and plug it into the wall socket by tapping on the cord. You need power, so we will return to this later.
Tap on the door that leads outside.
Room 3 (Outside) Clues
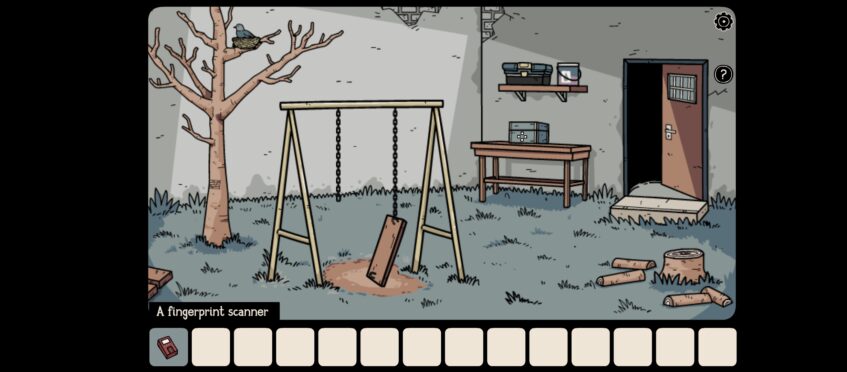
The following clues are available outside:
- A tree on the left-hand side, with a bird perched in a nest.
- Below the bird on the trunk of the tree, you will see a block clue showing various ❌'s aligned in different places.
- On top of a table on the far wall in front of you, you will see a box with different symbols.
- Above that is a paint tin and a toolbox. Tap on the paint tin and collect the piece of paper.
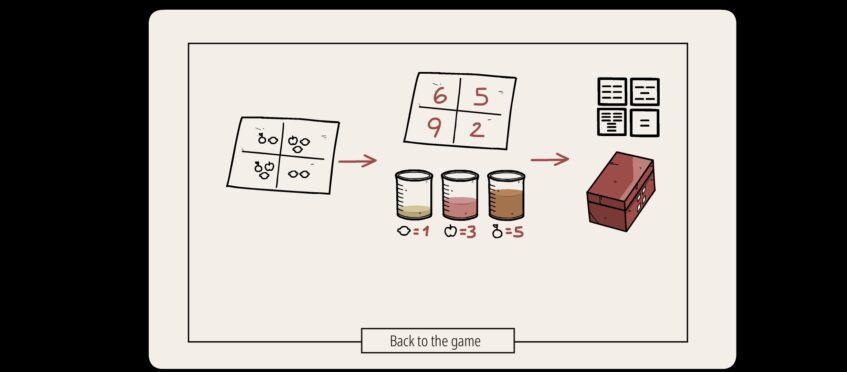
Proceed back inside. Using the symbols you found on the trunk of the tree, tap on the ship in the room with the game machine, and tap on each square containing an ❌. See the image below:
Collect the map and metal hook by tapping on them.
Using the map you collected, take a look at the potraits you found in room 1. Each has an image with a certain amount of bones in them. They are:
- Tree Island = 3 Bones
- Teepee = 5 Bones
- Sea Monster = 4 Bones, and
- Skull cave = 8 Bones
If you follow the path with your ship, the sequence would be:
- Skull cave
- Tree Island
- Teepee, and
- Sea Monster
Go through the square archway to room 4 with the game machine, and on the left hand side you will see the yellow box on top of a cupboard with two doors. Tap on the cupboard and use the sequence we found above. It should look like this:

Collect the rubber snake and shovel.
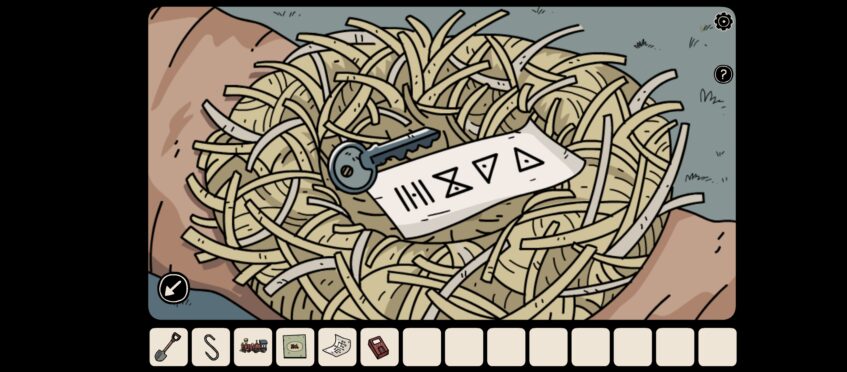
Proceed outside to the garden, and use the rubber snake to chase away the bird in the nest. In the nest, you will find a gray key and a sheet of paper with another clue. Proceed to room 4, through the square archway.
Room 4 Clues
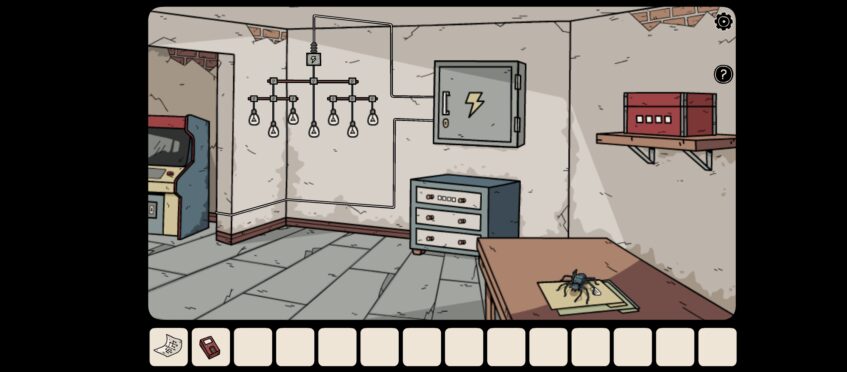
In room 4, you will find the following:
- An electric box on the wall.
- A cabinet with three drawers.
- A red box with symbols mounted on the wall on the right-hand side.
- A table with a spider sitting innocently on top of papers.
Tap on the chest of drawers and open the second and third drawers. Tap on the train and the book with the train contained in the drawers. We will come back to these a bit later.
Tap on the electric box, and use the gray key to open it. Using the clue we found earlier, enter the following sequence:
- ⬇️⬅️⬇️⬅️⬇️ Press Enter
- ⬇️⬅️⬇️➡️⬇️ Press Enter
- ⬇️➡️⬇️⬅️⬇️ Press Enter
- ⬇️➡️⬇️⬇️ Press Enter
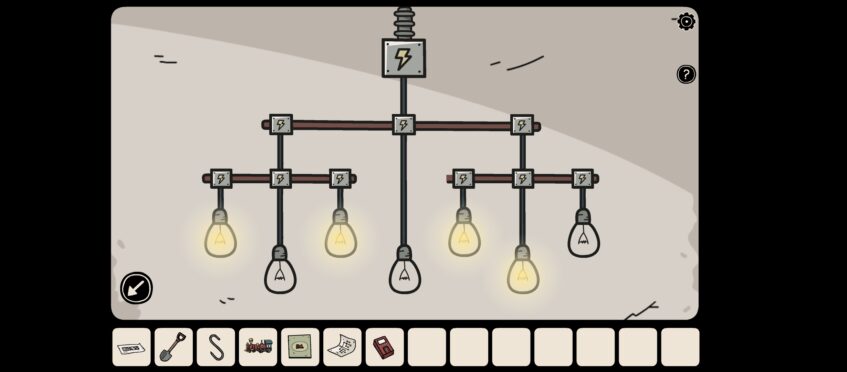
Your game machine now has power in room 2! Using the clue we found with the key in the birds nest, tap on the first drawer on the chest of drawers in the same room. Enter the symbols in the first drawer.
The first drawer will open to reveal a coin.
Proceed to room 2 and tap on the bottom of the game machine. Insert the coin.

Play the mini-game on the screen. You will need to collect 10 apples in order to reveal your next clue.
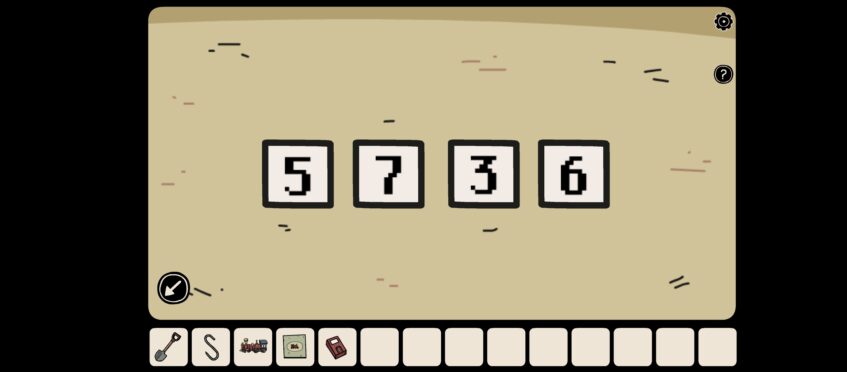
Using your perfect score, “5736”, enter the numbers in the yellow box on top of the cupboard, in the same room. Collect the plastic container.
Using the plastic container, proceed through the square archway to room 4, and trap the spider. The dockets on the table reveal the following clues:
- Laura
- Kay
- Jim
- Bobby
Each page has a symbol on the bottom. If you use the fingerprint scanner we collected earlier, each image will reveal another clue. The red box on the shelf is our next clue. Each one has a symbol above it.
Using the symbols on each page will reveal the order of each person, as follows:
- Jim
- Laura
- Bobby
- Kay
Using the fingerprint scanner on each page shows you what the image is that needs to be entered into the box. It should look like this:
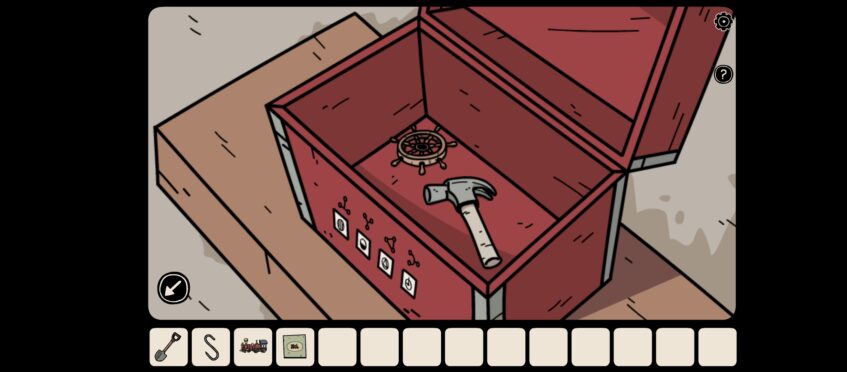
Collect the hammer and the miniature ship rudder. Proceed to room 2 where the game machine is.
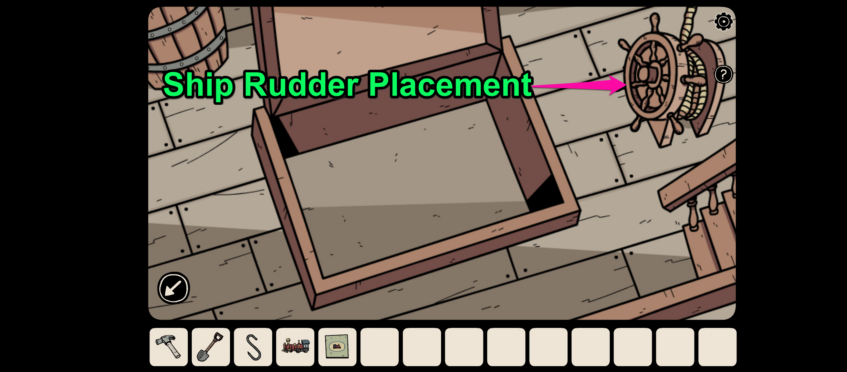
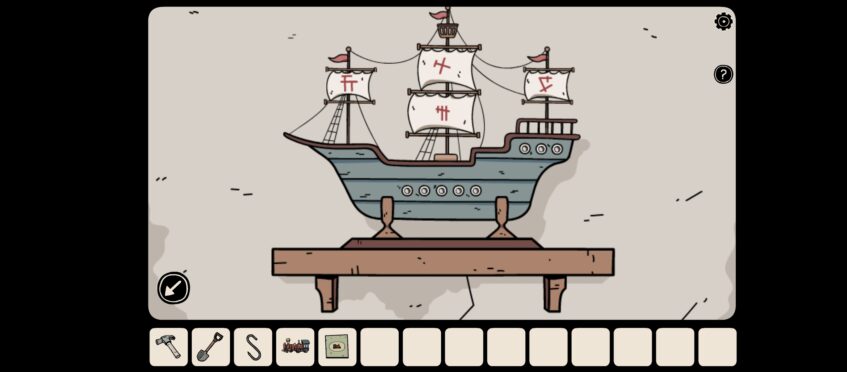
Place the ship rudder in the designated space. See the image below:
Tap on the rudder again to reveal your next clue:
Go outside and using the clues we just revealed from the ship, enter them into the gray box on the table.
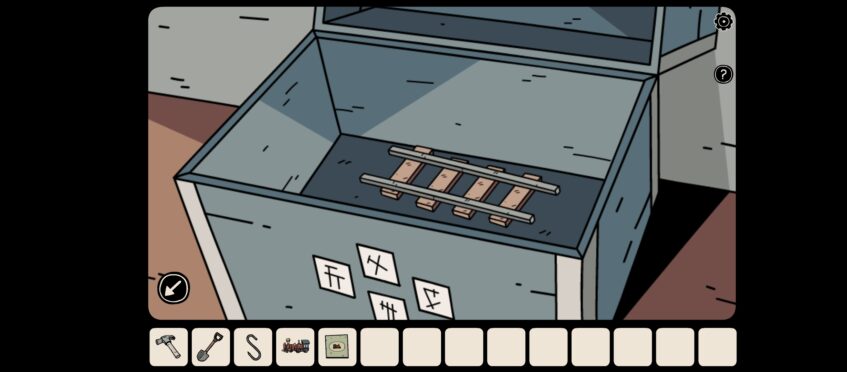
Collect the train railway track by tapping on it.
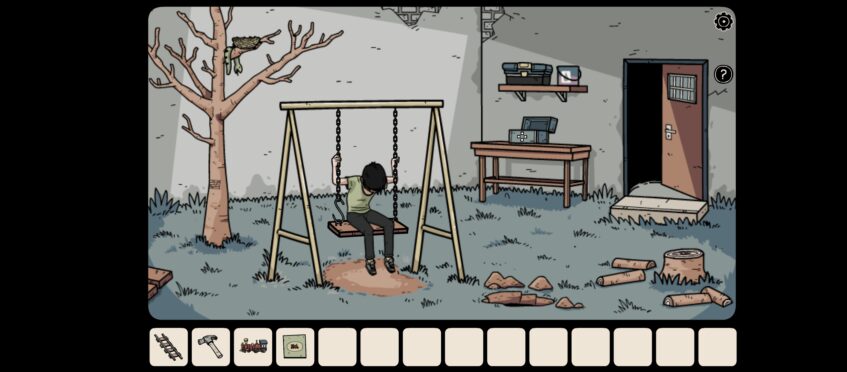
Use the metal hook to repair the swing and watch the cutscene. Using your shovel, dig a hole in the ground where the little boy is pointing. Collect the railroad switcher.
Proceed back to room 1 where you found the train set on the floor.
Place the train on the railway tracks. Place the railroad switcher and the track in their respective places. use the hammer to break down the rock blocking the train.
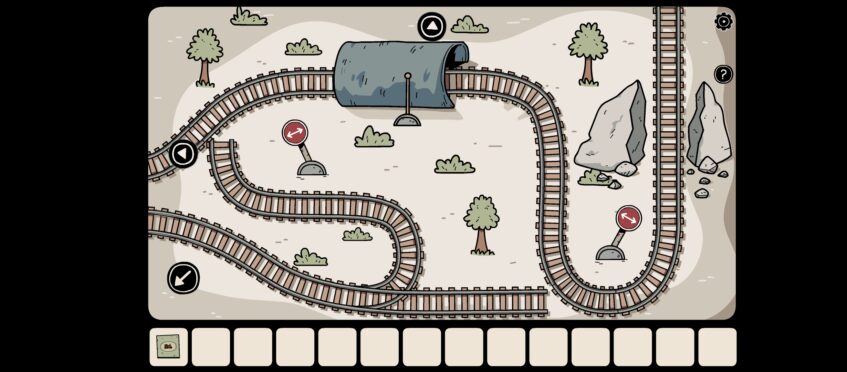
Using the book you collected will show you your next clue. You will need to create a safe passage for the train to go in a complete circle while traveling on the tracks. To do so, toggle the railroad switchers to ensure your train reaches the station again.
Start off by pressing the red button alongside the station where you placed your train. As your train goes along, flags will lift up showing the train is on the correct course. Be quick!
The train clue will reveal the following clue:
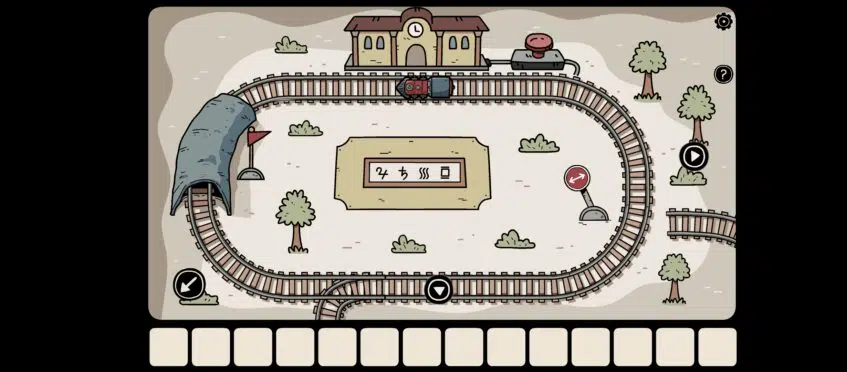
Enter the symbols in the gray box on the table, in the same room. You will receive a white key for the second floor.
Beyond The Room – Second Floor
First Room Clues
In the first room on the second floor, you will find the following clues:
- A mouse in a cage, alongside a purple box.
- A sandwich maker on a circular table.
- A white cabinet with 2 doors.
- A window that can be opened.
- A second room closed by a blue door.
- A square doorway with a bead curtain closing the entrance.
Tap on the window and open it. Tap on the window again to see outside. Tap on the flower on the right-hand side and collect a petal.
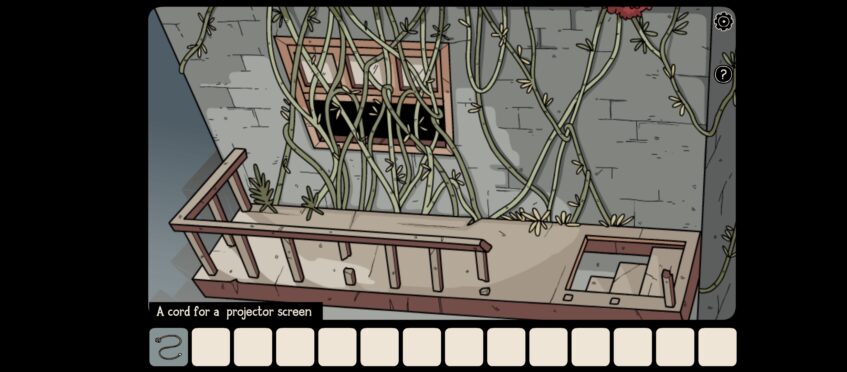
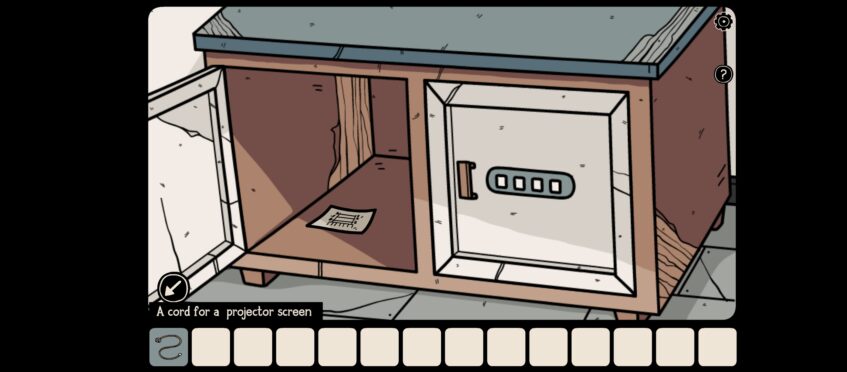
Tap on the stairs to climb them. On the floor by the window with the vines, you will find a cord for a projector screen. Tap on it to place it in your inventory.
Return to the first room, and tap on the white cabinet. Collect the piece of paper from the right-hand side cupboard.
Tap on the blue door and enter the bathroom.
Room 2 (Bathroom) Clues
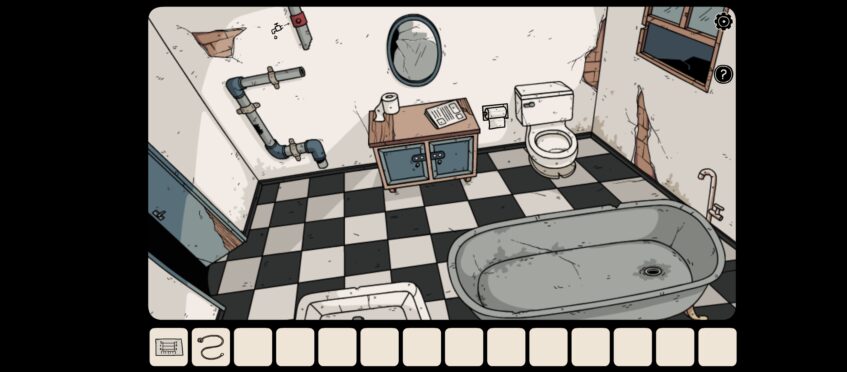
In the bathroom, you will find the following clues:
- A broken pipe against the wall.
- A wooden cabinet with two blue doors.
- The toilet roll.
- The bathtub.
Continuously tap on the toilet paper roll until all the toilet paper has unraveled, then tap on the toilet roll itself to collect the next clue.
Proceed through the doorway with the beaded curtains.
Room 3

In room 3, you will find the following:
- A cat perched on the vent pipes on the far wall across from you.
- A fan with no blades on a square table.
- A mouse hole in the vents where the cat is lying on the left-hand side.
- A red box on a square table.
- On the right, you will see a square table with a milk carton, a recipe for an invisibility potion, as well as a measuring glass with liquid in it.
- A white circular table with a wooden board on top of it.
Tap on the arrow leading to the fourth room.
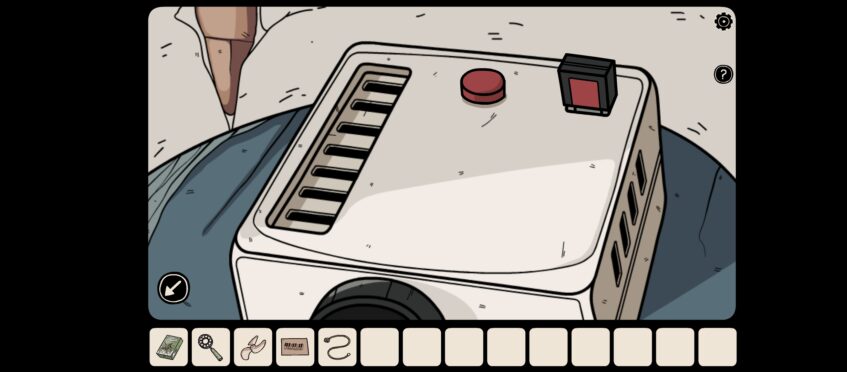
Room 4 Clues
In the fourth room, you will find the following clues:
- A camera is situated on top of an oval table, in the center of the room.
- A blue cabinet with two white drawers.
- A shelf with a red box above the cabinet. Two glass doors lead outside.
- Four portraits against the wall on the right-hand side.
Tap on the chest of drawers and collect the items; Fan blades and a small key.
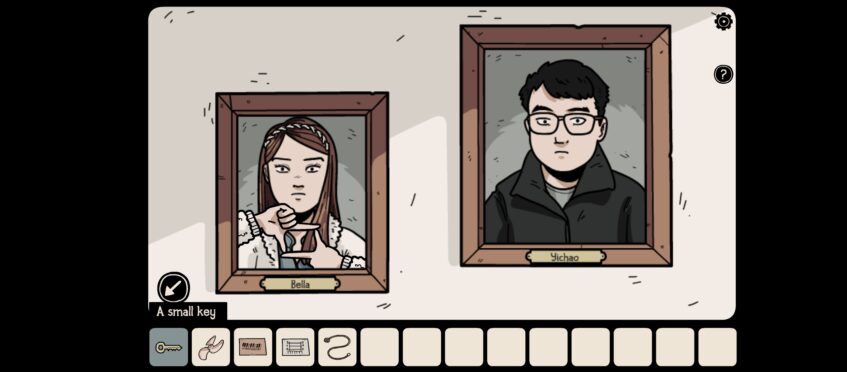
Tap on the first set of portraits, Bella and Yichao.
When you tap on them, each will show you a shape using their fingers. They are as follows:
- Bella = Square
- Yichao = Triangle
The next two portraits are Abbie and Prince:
- Abbie = X
- Prince = Circle
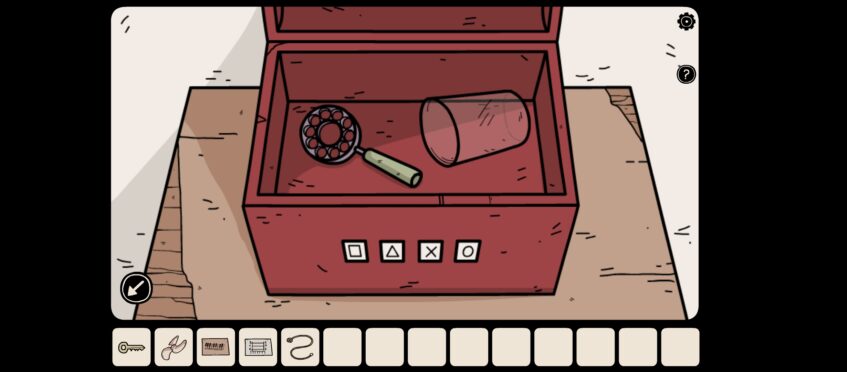
Using this sequence we found in room 4, go back to room 3 and use them on the red box on the square table, like this:
Collect the bubble wand and the drinking glass.
Use the glass you collected and place it on the table with the wooden board.

Once the cutscene ends, tap on the glass and memorize the symbols. Use those symbols on the blue cabinet in the bathroom, like this:
Collect the cat food and the memory card by tapping on them. Proceed to room 4 with the camera on the circular table. Place the memory card in the slot and press play on the screen.
The sequence is as follows:
- Up,
- Left,
- Up,
- Down,
- Right,
- Left
In the same room, tap on the arrows in the correct sequence, in the red box above the blue chest of drawers. Don't forget to tap OK when you are done.
Collect the detergent and yellow key.
Use the yellow key to unlock the glass doors in the same room. Go outside.
Using the clue we found earlier, arrange the pegs on the line in the following order:
- Top Row – 3 pegs on the left, 5 pegs on the right.
- Middle Row – 1 peg on the left, 7 pegs on the right.
- Bottom Row – 6 pegs on the left, 2 pegs on the right.
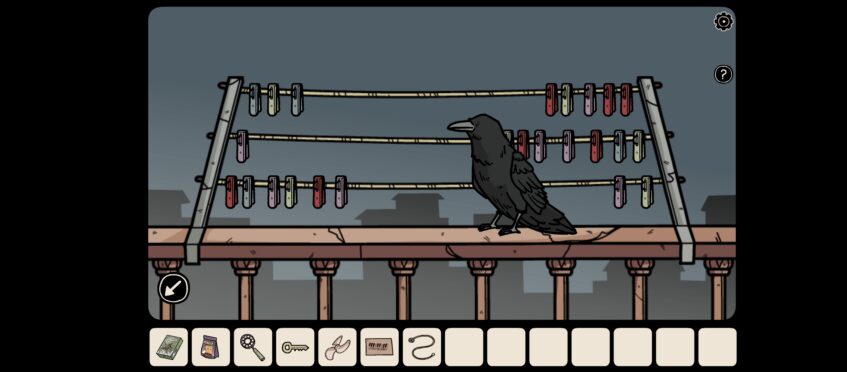
After the cutscene, tap on the raven to collect a feather.
Proceed back to room 1 where you found the mouse in the cage, Use the small key to unlock the cage. Tap on the mouse to pick it up, (eww gross, or cute, it's up to you!).
Go to room 3 through the curtains and place the mouse in the hole. To avoid a very nasty incident, feed the cat the cat food before tapping on the mouse.
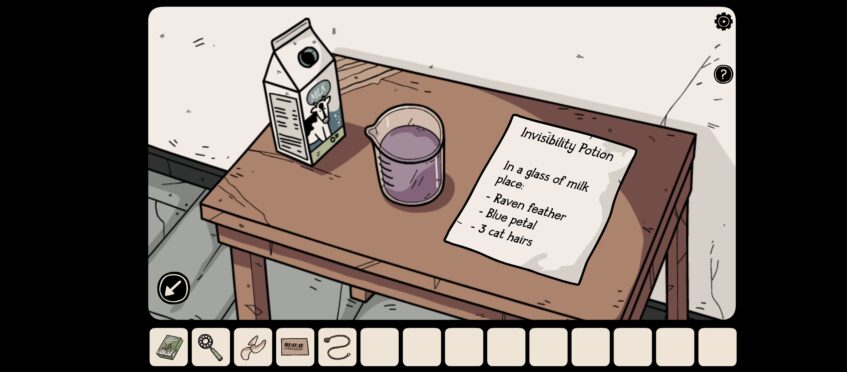
Once you have done that, you will receive 3 cat hairs. Tap on the table with the potion and milk carton located in the same room on the right. Add the following ingredients to the glass:
- Raven feather,
- Blue petal, and
- 3 Cat hairs
The potion will change to purple in color showing it worked. Collect the glass and pour the potion over the mouse.
The mouse will turn invisible, and collect the USB drive for you. Tap on the mouse to collect it.
Proceed to room 1 where you found the mouse and place the USB drive in the projector.
To deploy the projector screen, use the cord in your inventory we collected earlier and tap on the screen. Tap on the cord to release the screen and turn the projector on by pressing the red button.
Memorize the keys played on the piano and in what sequence they are pressed, displayed on the projector screen. Using the page we found earlier, you will enter the images as follows:
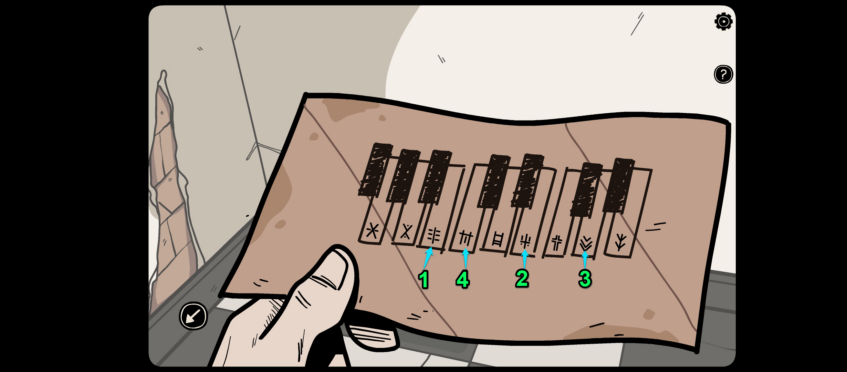
These will be entered in the Purple box located in the same room. Collect the bathtub plug and proceed to the bathroom.
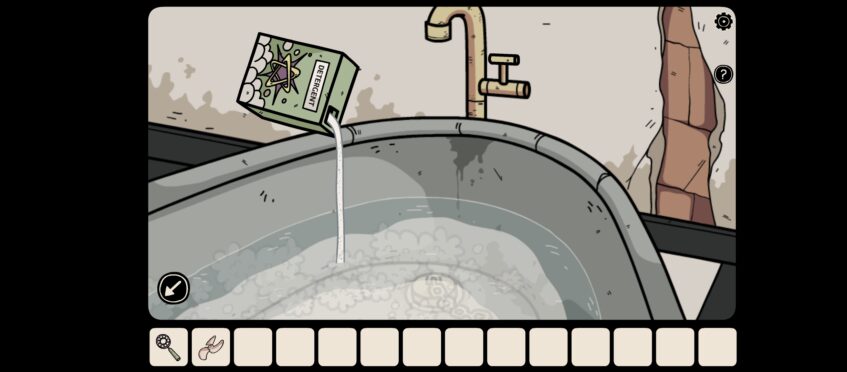
Place the bathtub plug in the bath, toggle the tap to turn on the water and fill the bath. Add the box of soap powder to the water and use the bubble wand.
Exit the bathroom and proceed to the room with the cat, room 3. Place the fan blades on the fan and tap it. You will see the blades turn. tap on the bubble wand and place it in front of the fan. The bubbles will appear on the wall.
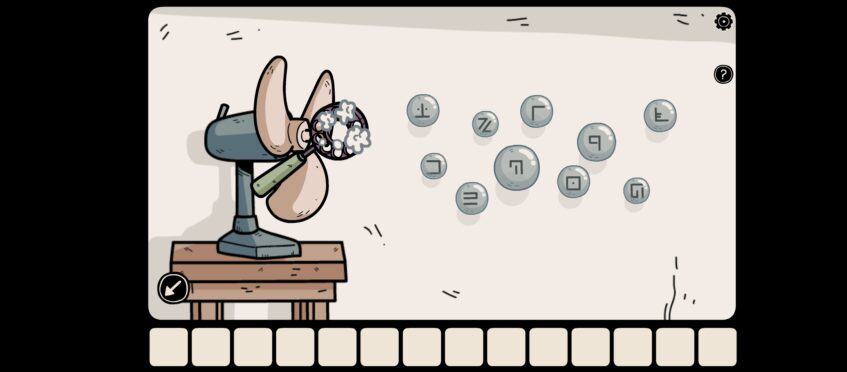
Tap on all the bubbles until only 4 remain. Proceed to room 1 where you found the mouse in the cage and enter the code in the white cabinet door, on the right-hand side:
Collect the sickle.
Tap on the window in the same room and climb the emergency ladder on the outside of the building. Use the sickle to cut down the vines. Tap on the window to enter a new room from outside.
Beyond The Room – Third Floor
Room 5 Clues
In the room you will find the following clues:
- A red box on a square white table.
- A hand ornament on a shelf.
- A door with two locks on the left.
- An archway leading to another room.
Proceed through the archway to room 6.
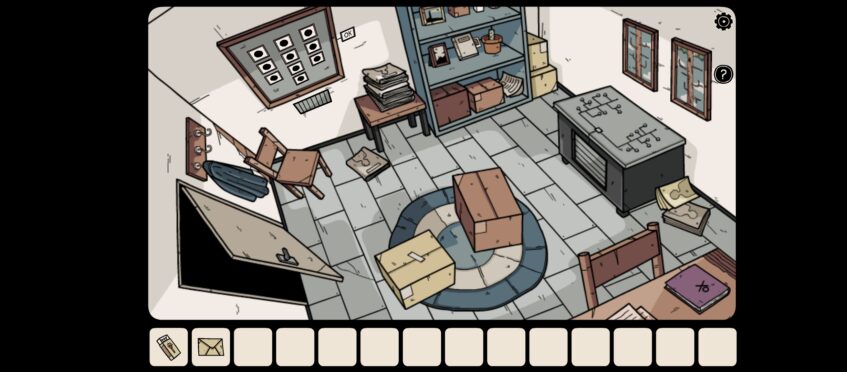
Room 6 Clues
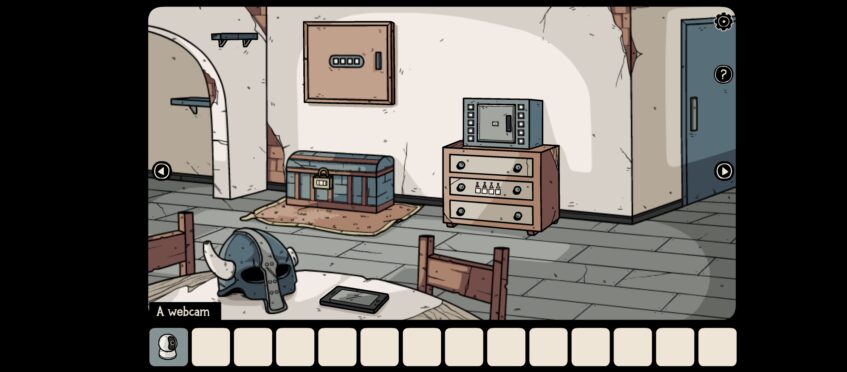
In this room you will find:
- A Viking helmet and a tablet on a circular table.
- A webcam on a shelf in the top left-hand corner alongside the archway. You can pick it up.
- A large chest with a lock.
- A trapdoor with another symbol lock.
- A chest of drawers with 3 drawers.
- A safe on top of the chest of drawers.
- A passageway leading to another room.
Proceed to the next room.
Room 7 Clues
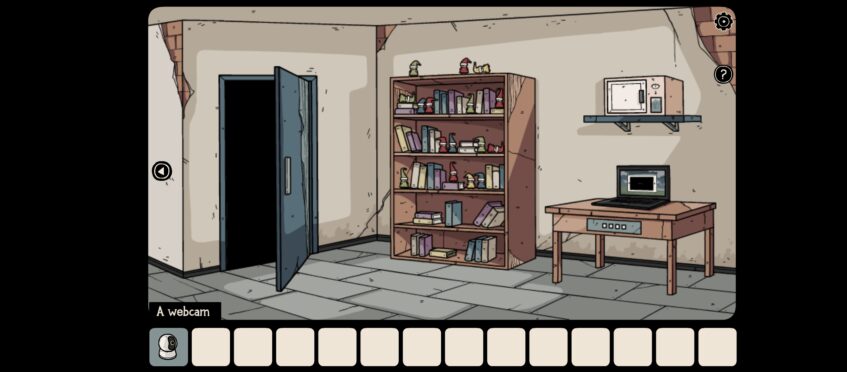
In this area you will find:
- A large bookshelf with books and elves.
- A safe on top of a shelf mounted to the wall.
- A table with a drawer, and a laptop situated on the table.
- A blue door leading to another room.
Count the amount of elves on the bookshelf and take note of each color. The sequence is as follows:
- 6 Red elves
- 3 Blue elves
- 5 Green Elves, and
- 2 Yellow elves
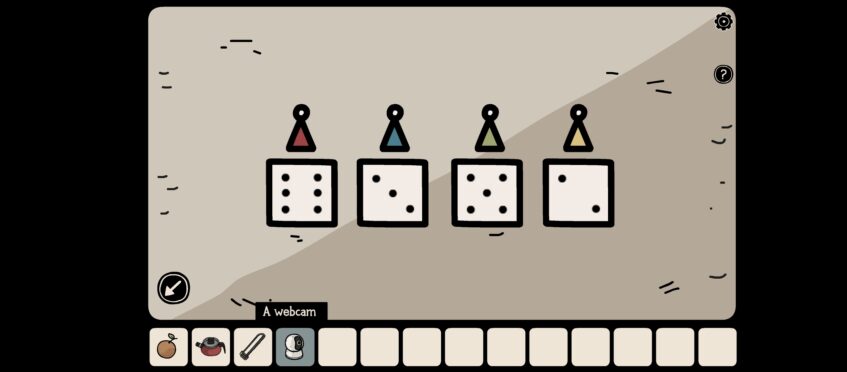
Using this sequence, tap on the second drawer in the previous room where the Viking helmet is, (room 6), and tap on the dice until they show the correct numbers.
Collect the rope and the red water valve.
Proceed through the blue door.
Room 8 (Kitchen) Clues
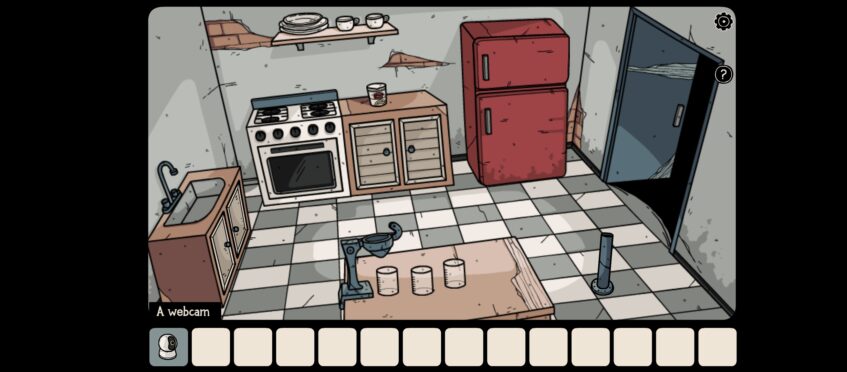
In room 8, the following clues are available:
- A basin with a tap.
- A stove and oven alongside a cupboard with two doors.
- A red refrigerator.
- A square wooden table with a juicer.
- A metal pipe sticking out of the floor.
- The door leading back to the way you came from.
Open the cupboard under the basin and collect the hacksaw.
Open the oven door and tap on the red kettle to place it in your inventory.
Tap on the bottom fridge door and collect the orange.
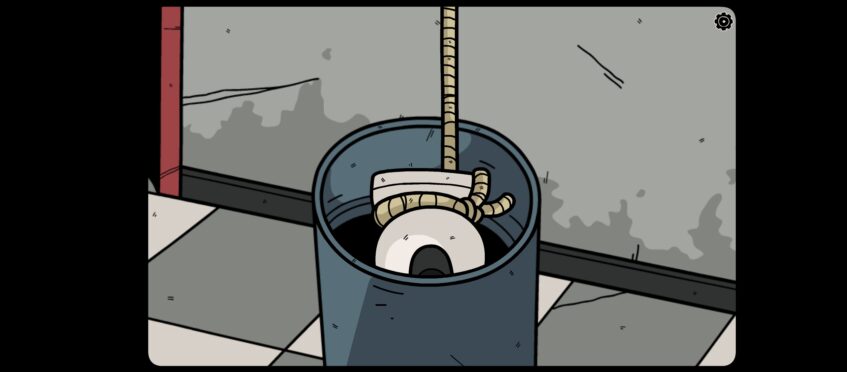
Attach the rope to the webcam in your inventory, and place the rope in the pipe sticking out of the floor.
Watch the cutscene. On the PC in the previous room (room 7), you will see the next clue by scrolling to the right on the computer screen.
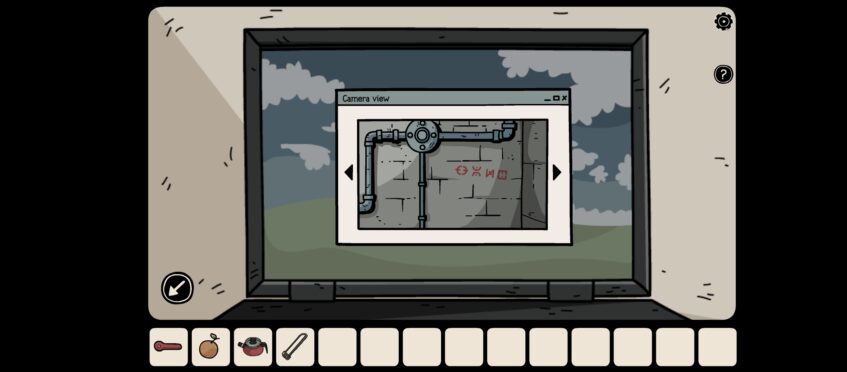
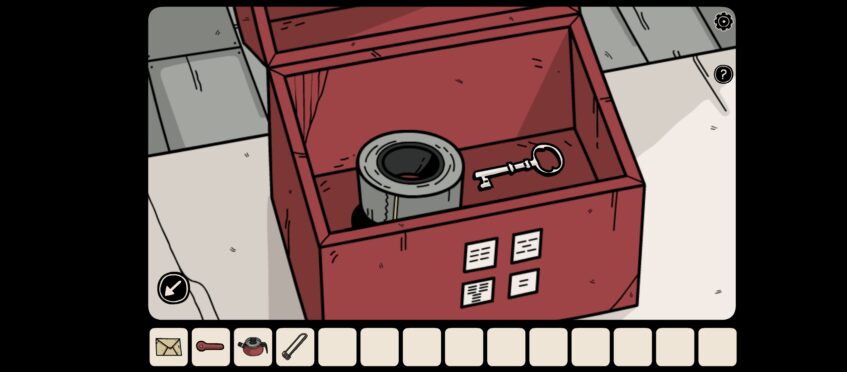
These symbols will open up the chest in the previous room (room 6).
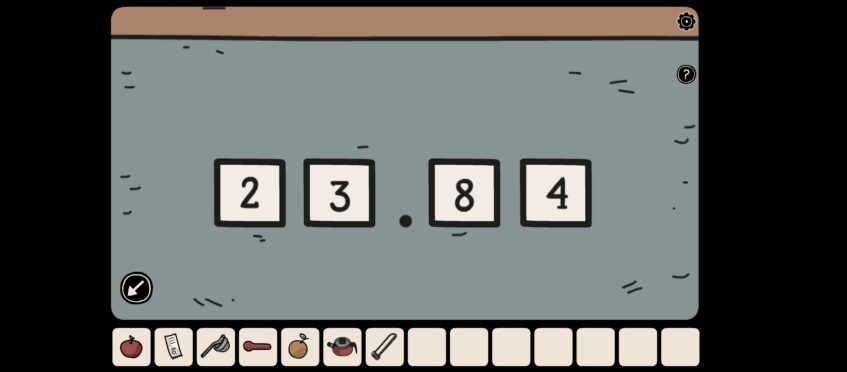
Collect the supermarket slip, juicer component, and the apple.
Go to room 7 and use the numbers on the supermarket receipt on the table with the PC. Enter the numbers into the drawer; ie. “23.84”:
Collect the puppet of a man. Proceed to room 5 where you found the hand on the shelf and place the puppet on the hand.
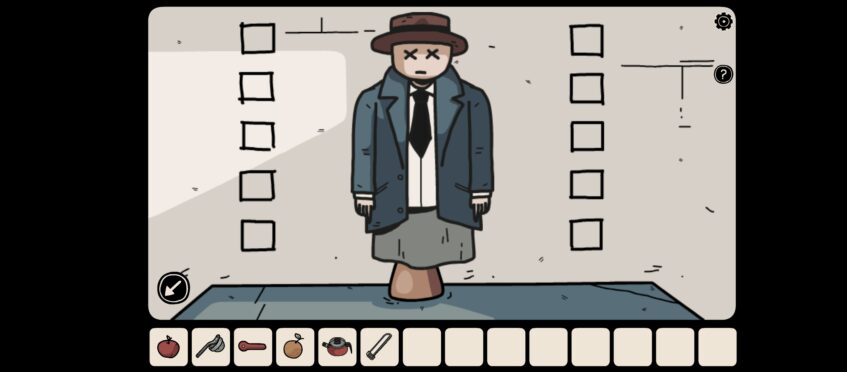
The puppet man indicates exactly which blocks to press on the safe in room 6 with the Viking helmet. Enter them as follows:
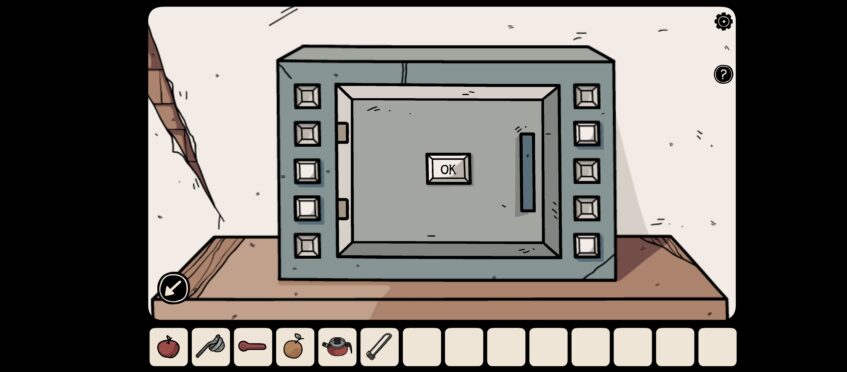
Don't forget to press the OK button once you are done. Collect the lemon and the red key.
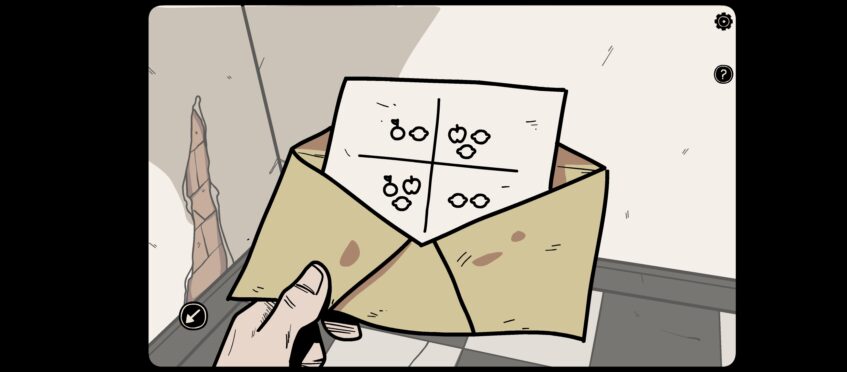
Use the red key in the white lock on the door of the first room we entered when we came through the window, (room 5). You will receive an envelope. Tap on it to reveal the clue.
Proceed to the kitchen (room 8) and attach the juicer component to the juicer on the table.
Place the orange, apple, and lemon separately in the juicer, and tap on the juicer component to squash them for juice.
Using the sequence, we will add this clue to the red box in room 5 where we found the hand on the shelf.
The sequence is as follows according to the clue on the glasses and fruit juice:
- Lemon juice + apple juice = 6
- Lemon juice x2 + apple juice = 5
- Lemon juice + apple juice + orange juice = 9
- Lemon juice x 2 = 2
Collect the pipe tape and the white key.
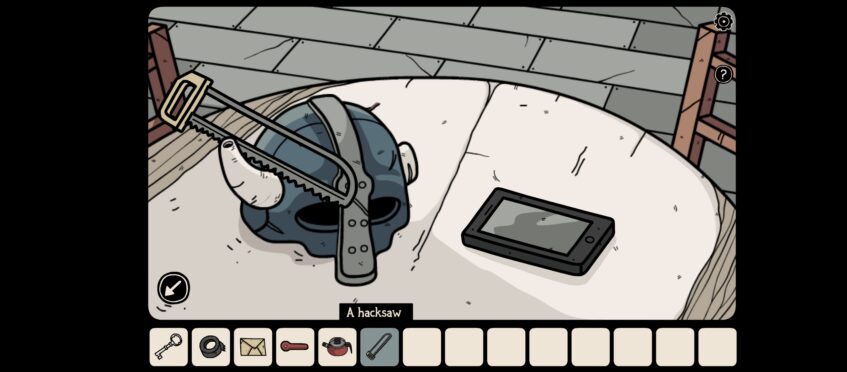
Use the hacksaw to saw off the horn on the Viking helmet.
Use the white key to open the door in the same room.
On the landing, tap the newspaper lying on the floor and pick up the matches.
Go back into the first room, and climb through the window. Go down the stairs to the second floor, and go back to the room with the mouse cage. Once you are on this floor, go to the bathroom and tap on the pipes on the wall.
Step 1. Place the water valve in the designated area.
Step 2. Use the roll of pipe tape to fix the pipe.
Step 3. Place the horn that you sawed off in the pipe so the water won't run out.
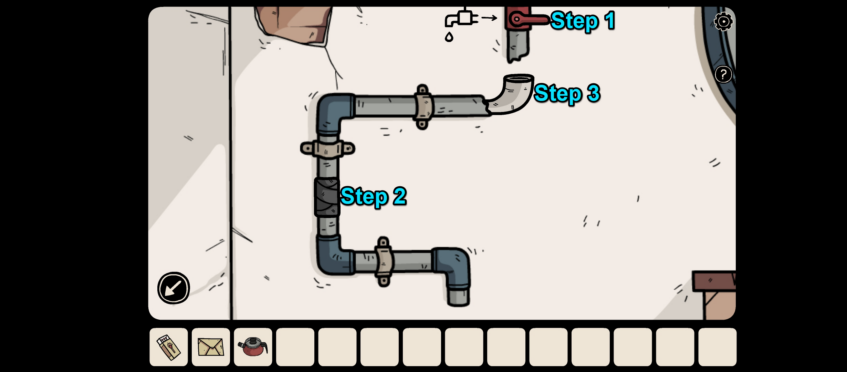
Turn on the tap and watch the cutscene.
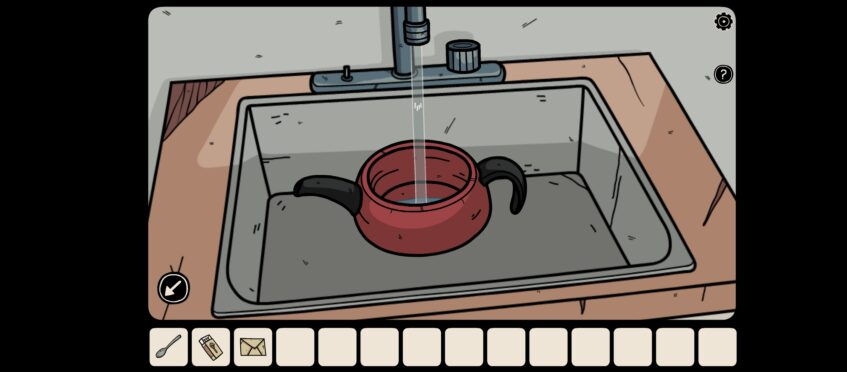
Pick up the spoon that came out of the pipe.
Go back upstairs through the window to the kitchen on the third floor. Place the kettle under the tap in the basin, and turn the water on.
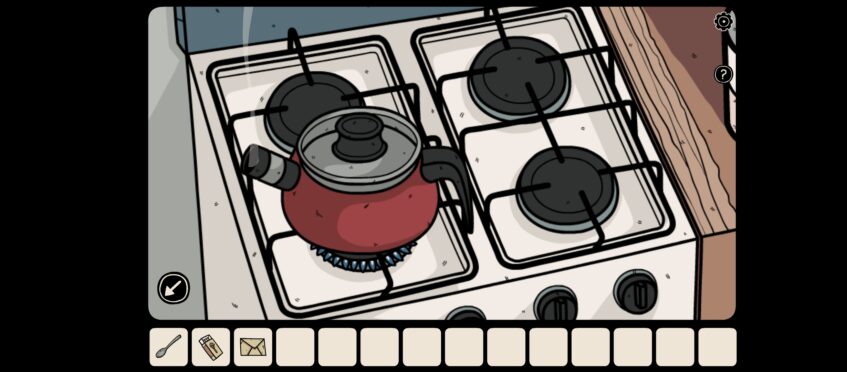
Place the kettle on the stovetop and use the matches to light a fire beneath the kettle. Make sure the kettle is steaming and remove it from the stovetop.
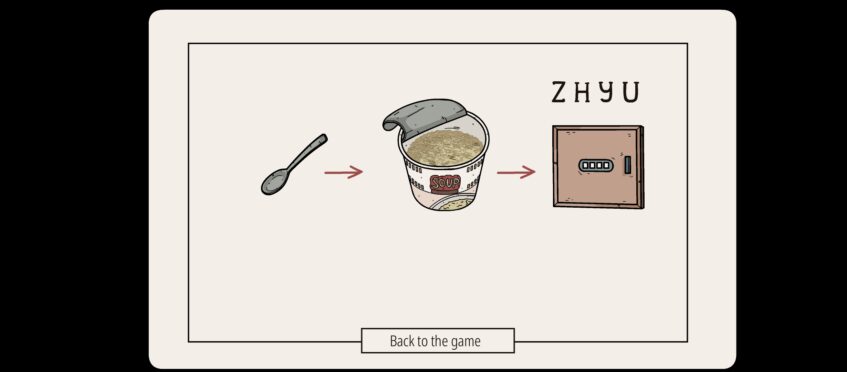
Use your finger to slide the lid of the soup open.
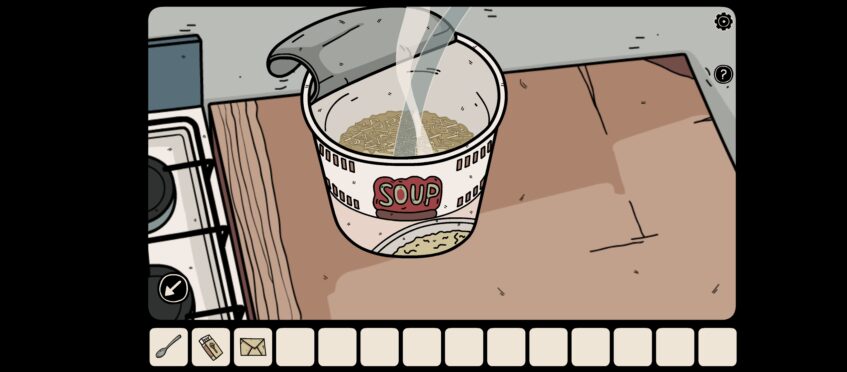
Add the boiling water to the soup, and use the spoon to stir it.
The code found in the spoon will be used to open the trapdoor in room 6 with the Viking helmet. Enter “ZHYU” in the designated space.
The next clue is a memory game. Tap on each square until two pairs of everything are matched.
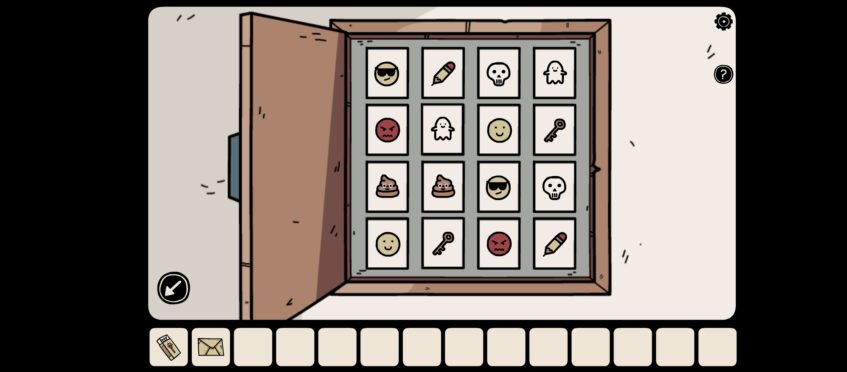
Once you have done that, four images will be revealed:
- an angry face,
- a ghost,
- a smiley face, and
- a key
On the table alongside the Viking helmet, enter these images on the screen on the tablet. Press the green button and watch as a new clue is revealed.
In the next room (room 7) with the PC on the table, tap on the safe above. Tap on the tablet and select “GRAB”. Hold the tablet in front of the eye on the safe.
You will receive a yellow key.
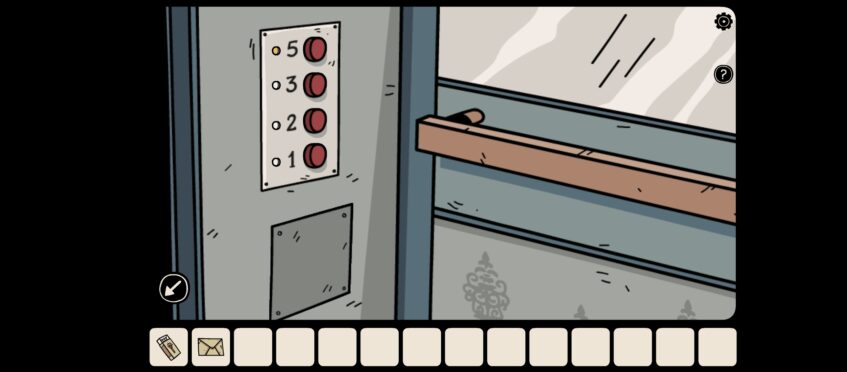
Go through the window again and proceed to the very first floor, in room 1 where we found the elevator. Use the yellow key on the elevator, watch the cutscene, and press floor 5.
Beyond The Room – Fifth Floor
Room 1 Clues
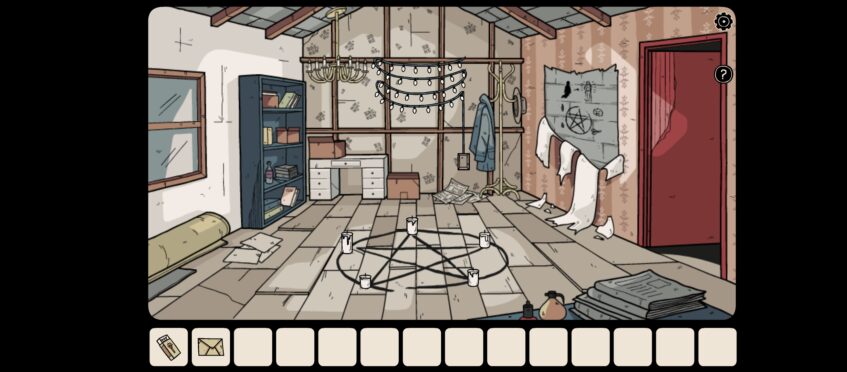
In room 1 on the fifth floor, you will see the following clues:
- A poster on the right-hand side wall shows you the ritual needed to free the girl.
- Light bulbs on the far wall.
- Candles on the floor placed on 5 corners of the star.
- An empty wall socket where the wires lead to the bulbs.
- A red door leading to the landing.
Proceed through the red door.
Room 2 (Landing) Clues
- A clue can be found on the landing wall, you will need a slot card to find this clue.
- A tan door leading to another room.
Proceed through the tan door.
Room 3 Clues
Here you will find the following:
- A square board on the left-hand side with circles.
- A blue bookshelf. Tap on the photograph to pick it up.
- Two windows with weirdly shaped trees.
- A steel table with buttons that light up when touched.
- A box with a pumpkin in it in the center of the room. Tap on the pumpkin to pick it up.
- A rectangular wooden table with a purple book on it. This book contains the names of denizens who have turned to shadows.
Exit the room and go down the stairs.
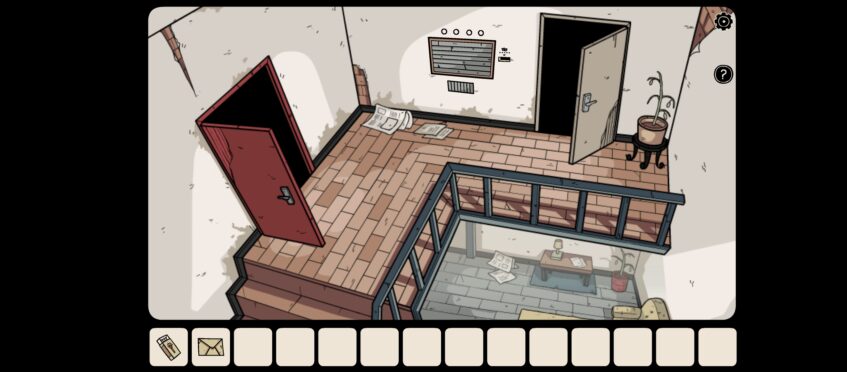
Room 4 Clues
In this room you will find the following clues:
- A red door under the stairs.
- A square blue table with pieces of paper on it.
- The elevator.
- A square archway leading to another room.
Proceed through this archway.
Room 5 Clues
Room 5 contains the following clues:
- A square blue table with a safe with different color buttons on it.
- A circular wheel that can spin mounted on the wall.
- A birdcage with a bird hanging outside the window.
- A brown cabinet with two white doors.
An archway leading back to the previous room, and an arrow on the right leading to the final room. Proceed right to the last room.
Room 6 Clues
In this room, your clues are as follows:
- A square board on the wall above the blue armchair with dice displayed.
- A box and a green book are on top of a rectangular table.
- A circular blue and green mat on the floor.
- A wastepaper basket with papers in it.
- The doorway leading back to the previous room.
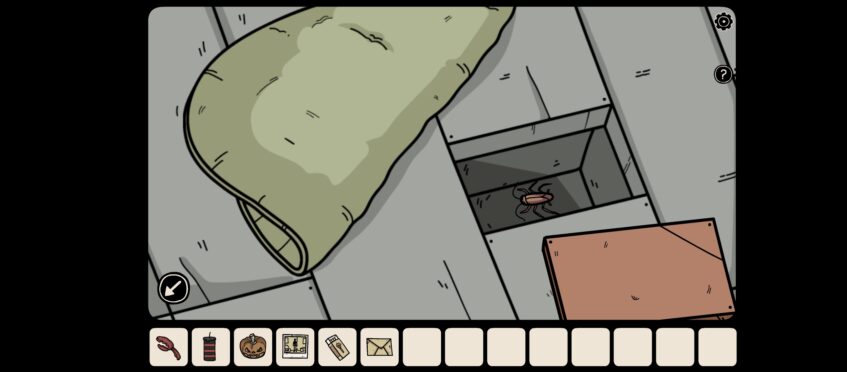
Tap on the circular mat. Open the floorboard and collect the cockroach (Eww!).
Tap on the wastepaper basket, and tap on the paper. Be very specific as to which papers you are tapping on, as there are three that will show you different images. They are:
- Top – Blue apple with dots
- Left – Purple fish with scales
- Right – Red frog with curly squiggles
These images are your clue to the circular wheel mounted in room 5. Tap on each symbol until it is correct, in the sequence found above, starting with the fish, then the apple, and lastly the frog.
Collect the red key and black candle.
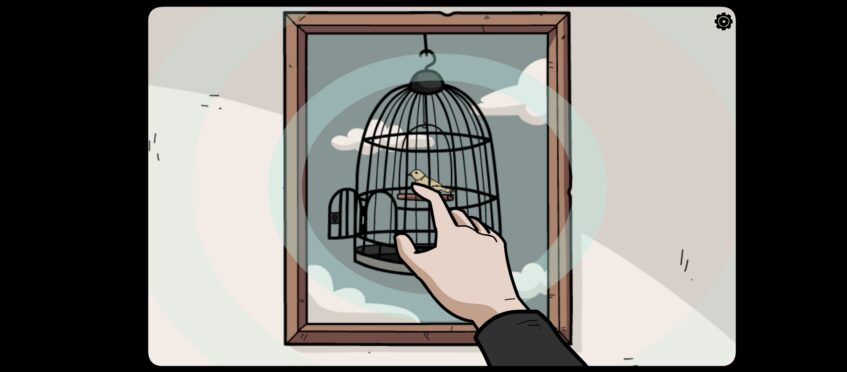
Use the red key to unlock the birdcage in the same room. Tap on the bird to collect it.
Go to room 3 where you found the steel table with buttons. Tap on the windows with the weirdly shaped trees and place the bird in the nest.
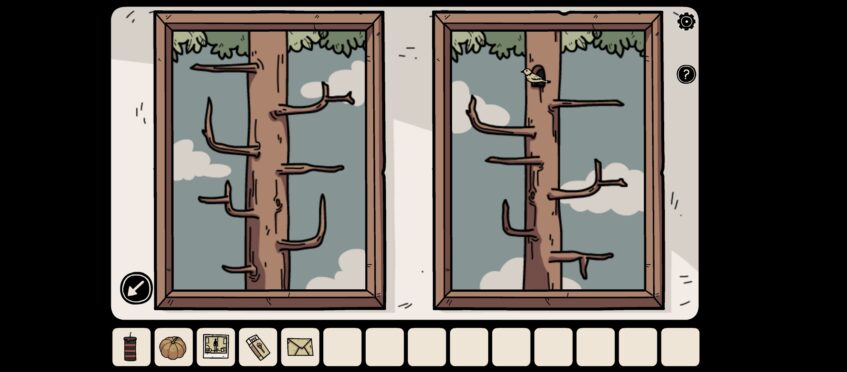
Tap on the bird and memorize its flight path. Use the bird's exact flight path to light up the buttons on the steel table.
Tap on OK and collect the screwdriver.
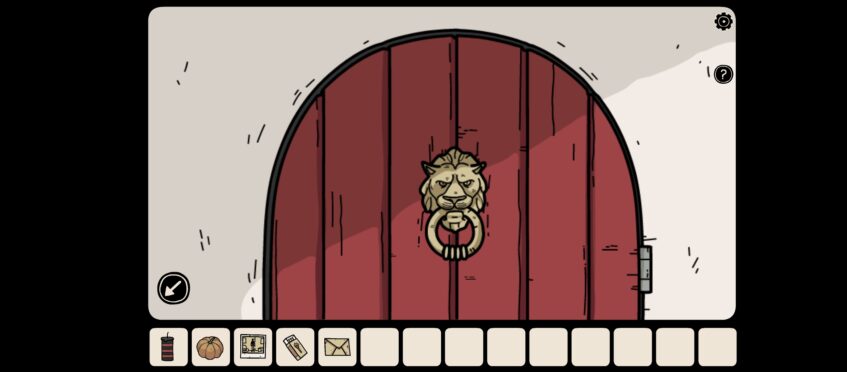
Proceed to the elevator and use the screwdriver to open the hatch. Collect the door knocker.

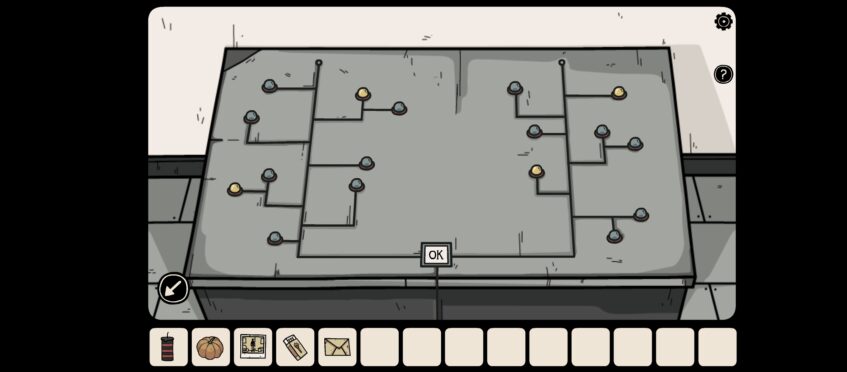
Place the door knocker on the red door with the lion's head as you come out of the elevator. Tap on it again to knock. Open all the doors on the miniature house, and memorize the pattern.
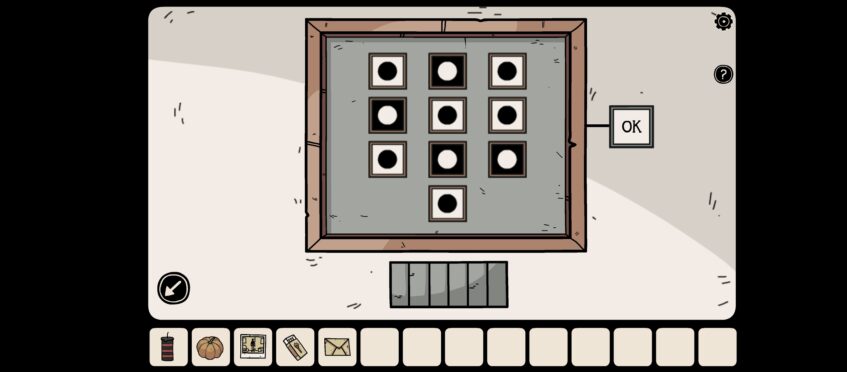
Return to room 3 through the tan door upstairs and on the square board with the circles, tap the circles until they look the same, then tap OK.
Collect the electrical fuse. Go back to room 1 and place the fuse in the electrical outlet below the bulbs.
Take note of the amount of bulbs flashing and what color they are:
- Red = 4
- Blue = 8
- Purple = 3
- Green = 6
Go downstairs again and in room 5 with the birdcage, tap on the safe, and enter the above sequence accordingly.
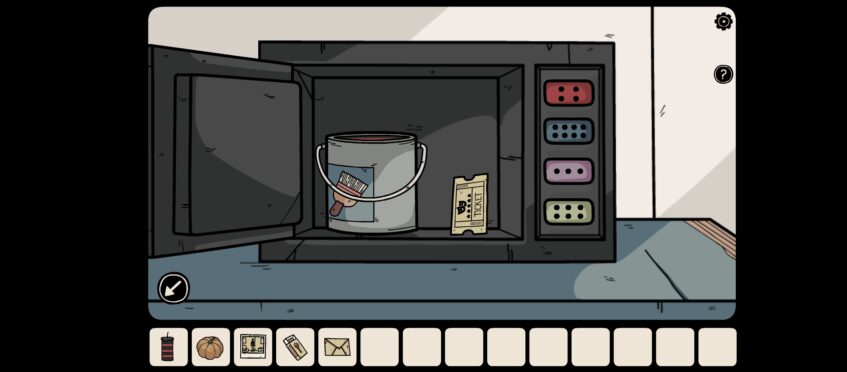
Collect the red paint and the movie ticket.
Proceed to the landing with the red and tan doors and place the ticket in the allocated space. Don't forget to select “Grab”.
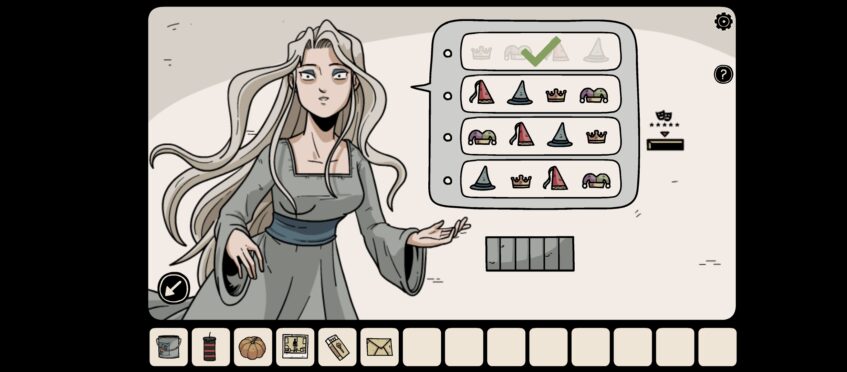
Take note of the hats on the puppets. They are:
- King,
- Clown,
- Maiden, and
- Wizard
In this instance, the top row will be correct.
The second time, the last row will be correct.
The third time, the second row is correct.
The last time, the third row is correct.
Collect the crab claw.
Proceed downstairs to the last room with the blue armchair, and toss the red paint by tapping on the walls.
Tap on the guy and watch as he reveals four numbers: 6, 9, 2, and 4.
Tap on the dice on the wooden board alongside the man and press OK, then collect the ice bucket.
Use the elevator to go to floor 3 where the kitchen is, and place the ice bucket in the sink. Turn on the tap. Collect the ice tray after it has been filled with water and place it in the freezer section of the refrigerator.
Proceed to the fifth floor again using the elevator and solve the puzzle on the blue table in the room.
Go to room 5 and Use the clues on the brown cabinet with the white doors. Take note of the angles the shadows are pointing to, they are:
- ↗️ + ⬅️
- ⬇️ + ↘️
Collect the key handle.
Return to the kitchen on floor 3 using the elevator, and place the key handle in the ice tray. Close the door, open it again, and collect the key handle.
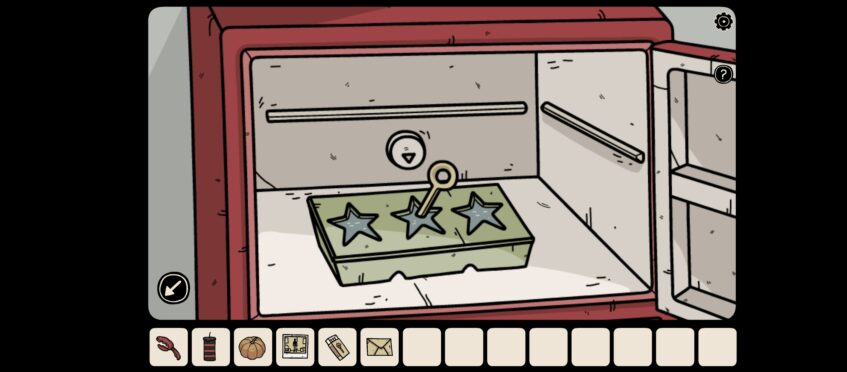
Return to the landing on floor 3, alongside the elevator, and use the star-shaped ice in the designated space:
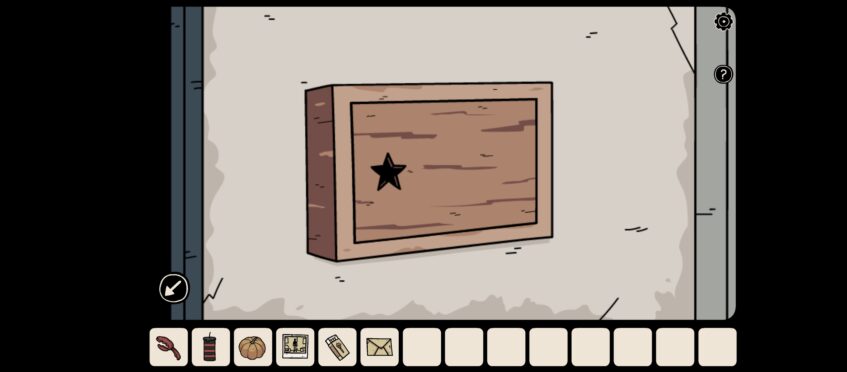
Collect the knife.
Use the knife to carve out a face on the pumpkin.
Use the elevator and go to the room with the red door, (room 1).
Place all the items according to the poster on the wall, ie. cockroach, pumpkin, crab claw, and candle.
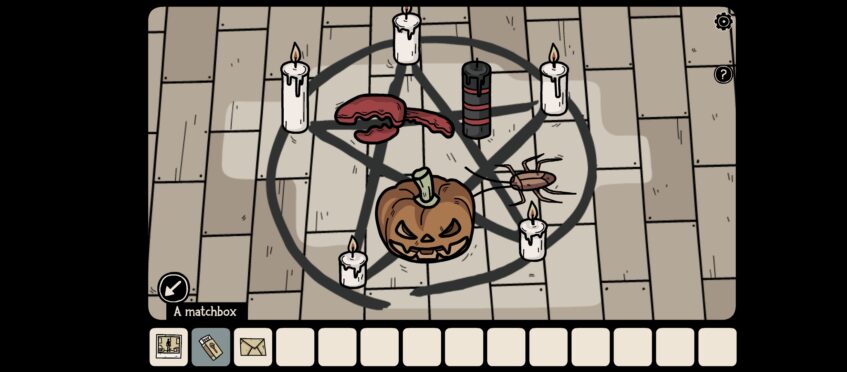
Use the box of matches to light all the candles. Watch the cutscene.
Conclusion
I hope you had as much fun as we did playing this game! I won't tell you what happens in the end, however, let us hope that Dark Dome brings us another puzzle game soon! Let us know in the comments section below if you get stuck!
Check out these other articles from Dark Dome: Another Shadow, Escape From The Shadows, and The Past Within. Happy Gaming!