


You probably owned a Motorola Razr V3 flip phone back in the early 2000s. Every time you powered it, you heard “Hello, Moto”. While the company behind such phones has long rebranded and upgraded its devices, the name “Motorola” still evokes nostalgia.
Motorola phones are good choices because they run a near-stock Android OS, are durable, and offer reasonable pricing for their features. If you’re looking to buy one, here's a compilation of the best five to help you make an informed decision.
Summary of the best Motorola phones
- Best Motorola phone: Motorola Edge + 2023.
- Best entertainment phone: Moto G Play.
- Best value phone: Motorola Edge 40 Pro.
- Best foldable phone: Motorola Razr+/40 Ultra.
- Best budget phone: Motorola Moto G53 5G.
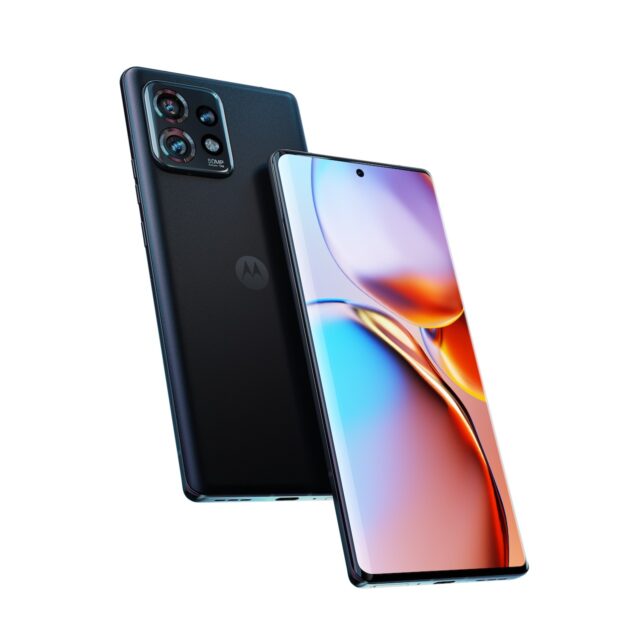
Motorola Edge+ (2023)
Pros
- Impressive display with a high refresh rate.
- Great camera quality.
- Large battery capacity.
- Near-stock Android OS.
Cons
- No Always-on display.
- Curved screens are prone to accidental touches.
Processor: Snapdragon 8 Gen 2 | Display: 6.7-inches OLED | OS: Android 13 | RAM: 8GB | Storage size: 512GB | Cameras: 60MP wide (selfie), 50MP wide, 12MP telephoto, 50MP ultrawide | Battery: 5100mAh | Earphone jack: USB Type-C | Price: $700
The Motorola Edge+ (2023) is a top-tier phone with a strong Snapdragon 8 Gen 2 processor, 8GB of fast memory, and spacious storage up to 512GB. Its big 6.7-inch OLED screen with a 165Hz refresh rate delivers stunning visuals. This is impressive, considering that the standard refresh rate on smartphones is 60Hz. Flagships often peak at 120Hz.
A trio of rear cameras includes a 50MP main, 50MP ultrawide, and 12MP telephoto. A sharp 60MP front camera makes capturing amazing photos and selfies with loved ones much easier. The phone is available in Interstellar Black for $800, but you can save $100 with a trade-in.
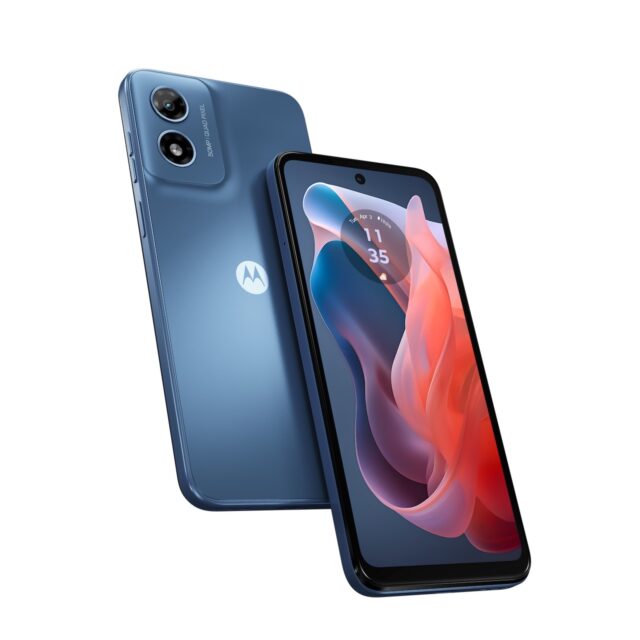
Moto G Play (2024)
Pros
- Affordable.
- Decent display.
- Large battery capacity.
- Near-stock Android OS.
Cons
- No Always-on display.
- Limited RAM & storage option.
- Unimpressive camera.
Processor: Snapdragon 680 4G | Display: 6.5-inches IPS LCD | OS: Android 13 | RAM: 4GB (expandable up to 6GB) | Storage size: 64GB | Cameras: 8MP wide (selfie), 50MP wide | Battery: 5000mAh | Earphone jack: 3.5mm | Price: $150.
Phones are great for consuming entertainment on the go through videos, music, browsing, and games. A big screen, good speakers, and long battery life make them enjoyable. The Moto G Play doesn't lack these qualities.
The large 6.5-inch LCD screen has a 90Hz refresh rate, enough for smooth animations and visuals. While it has more grayish or washed-out blacks than the true black you'll see on OLED screens, it's not so terrible or noticeable in bright environments.
The stereo speakers with Dolby Atmos complement it to provide an enjoyable audio experience when watching videos or playing games. Battery life is another strong suit of the Moto G Play, as the 5000mAh battery is likely to last a full day on a single charge—that is if you don't overwhelm it with intensive apps.
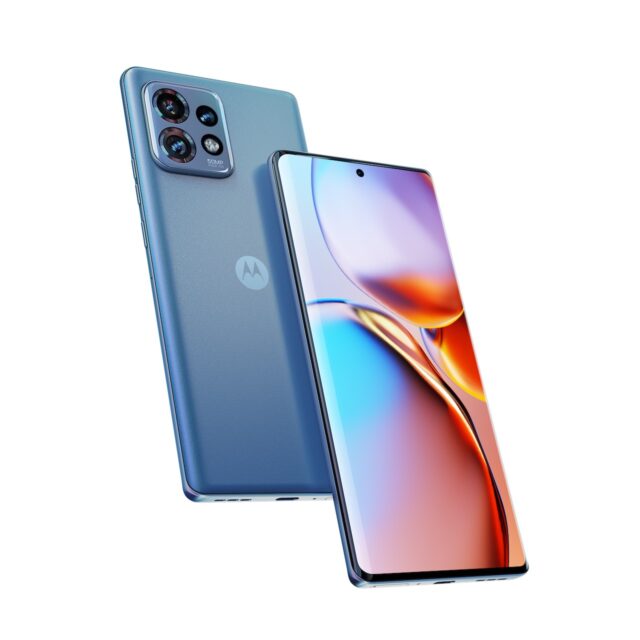
Motorola Edge 40 Pro
Pros
- Impressive display with a high refresh rate.
- Great camera quality.
- Decent battery capacity.
- Near-stock Android OS.
Cons
- No Always-on display.
- Battery capacity is lower than previous models.
Processor: | Display: 6.7-inches P-OLED | OS: Android 13 | RAM: 12GB | Storage size: 256GB, 512GB | Cameras: 60MP wide (selfie), 50MP wide, 12MP telephoto, 50MP ultrawide | Battery: 4600mAh | Earphone jack: USB Type-C | Price: $829
Motorola Edge 40 Pro is a strong contender with premium phones. It runs on the Snapdragon 8 Gen 2 mobile platform and uses 12GB LPDDR5X RAM for exceptional multitasking. The storage space reaches up to 512GB UFS 4.0, allowing faster read and write speeds.
The triple rear camera system includes a 50MP main sensor, ultra-wide-angle lens, and telephoto lens with Optical Image Stabilization (OIS) for clear photos. The 6.7-inch pOLED display offers a 165Hz refresh rate, Dolby Vision, and HDR10+ support. The battery capacity is a significant drop from its previous siblings on this list. But a 4600mAh battery with 125W TurboPower charging support and 15W wireless charging isn't a bad deal.
Durability is another mouthwatering feature, as the phone has an IP68 water resistance rating. Additional features include Ready For PC, which enables you to connect wirelessly to compatible TVs or monitors and use the phone as a desktop computer.
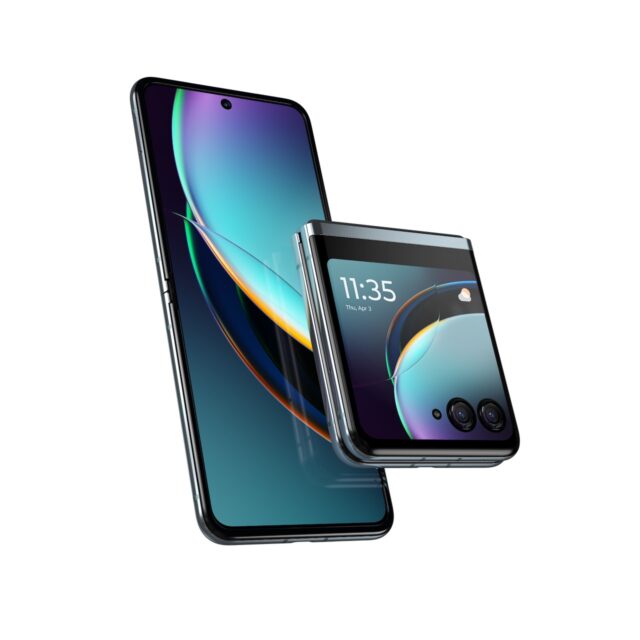
Motorola Razr+/40 Ultra
Pros
- Impressive internal display with a high refresh rate.
- Flexible and portable.
- Quick access features on an external display.
- Near-stock Android OS.
Cons
- Unimpressive camera quality.
- Small battery capacity.
- Expensive.
Processor: Snapdragon 8+ Gen 1 | Display: 6.9-inches P-OLED (main), 3.6-inches P-OLED (external) | OS: Android 13 | RAM: 8GB, 12GB | Storage size: 256GB, 512GB | Cameras: 32MP wide (selfie), 12MP wide, 13MP ultrawide | Battery: 3800mAh | Earphone jack: USB Type-C | Price: $1,130
The Motorola Razr+/40 Ultra reinvents the classic flip phone concept with a spacious external display for quick interactions. Its 3.6-inch pOLED screen lets you capture photos, control music playback, and reply to messages without opening the phone.
When unfolded, you'll see a 6.9-inch pOLED display. The Snapdragon 8+ Gen 1 processor powers it, and its camera setup features ultrawide and macro lenses. We love Motorola's use of Quad Pixel technology. It enhances selfie quality and even lets you shoot rear-camera selfies with the phone closed. We don't like the battery capacity, which is a small 3800mAh.
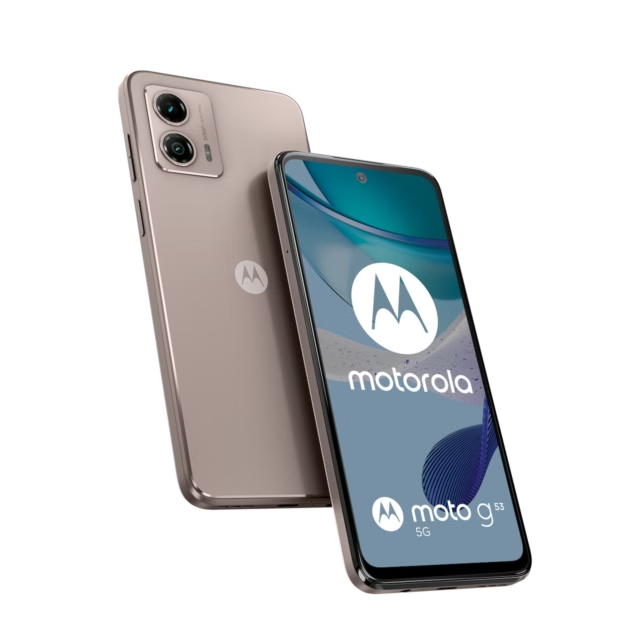
Motorola Moto G53 5G
Pros
- Affordable.
- Decent camera & display for its pricing.
- Large battery capacity.
- Near-stock Android OS.
Cons
- Limited RAM & storage option.
- Slow Processor
Processor: Snapdragon 480+ 5G | Display: 6.5-inches LCD | OS: Android 13 | RAM: 4GB, 6GB, 8GB | Storage size: 64GB, 128GB | Cameras: 8MP wide (selfie), 50MP wide, 2MP macro | Battery: 5000mAh | Earphone jack: 3.5mm | Price: $154
The Motorola Moto G53 5G is a budget-friendly phone with a long battery life. It has a 6.5-inch HD+ LCD display with a 120Hz refresh rate, a Snapdragon 480 Plus processor, 4GB of RAM, and 128GB of storage. The rear camera system is a dual-camera system with 50MP main and 2MP macro sensors. The front-facing camera is an 8MP sensor.
The Moto G53 5G runs Android 13 and is mainly free of bloatware. However, it's not powerful enough for intense tasks. The battery should easily last a day on a single charge. However, the charging speed is slow, at just 10 watts.
Choose Motorola's best
From the feature-loaded Edge+ to the budget-friendly Moto G53, you should be able to pick the perfect Motorola phone for you. But if you want phones with top-of-the-line specs and deeply integrated AI, Samsung phones will do just the trick. On the other hand, Pixel phones are Google's own pride and joy with the stock Android version and frequent updates.